Blog

  • $11 Million Ice-T House in Edgewater, New Jersey

    $11 Million Ice-T House in Edgewater, New Jersey

    Ice-T, the legendary rapper and actor, has made quite a name for himself in the entertainment industry. But did you know he’s also got a pretty sweet pad? Let’s dive into the world of Ice-T’s house and see what makes it so special.

    Who is Ice-T?

    Ice-T, born Tracy Lauren Marrow, is a multi-talented artist who’s been making waves since the 1980s. He’s not just a rapper, but also an actor, producer, and entrepreneur. With a net worth of $65 million, Ice-T has certainly done well for himself[3]. He’s got a few cars, but he’s not known for flaunting a huge collection. As for yachts and private jets? Well, those aren’t Ice-T’s style. He’s more of a down-to-earth kind of guy, despite his success. When it comes to homes, Ice-T keeps it simple with his main residence in New Jersey. He doesn’t own any private islands, but hey, who needs an island when you’ve got a sweet view of the Manhattan skyline?

    Ice-T at a Glance

    Detail Information
    Full Name Tracy Lauren Marrow
    Born February 16, 1958
    Birthplace Newark, New Jersey
    Occupation Rapper, Actor, Producer
    Net Worth $65 million
    Spouse Coco Austin (married 2002)
    Children 3
    Notable Works Law & Order: SVU, Body Count
    Awards Grammy Award
    Main Residence Edgewater, New Jersey

    Where Does Ice-T Live Now?

    Ice-T currently calls Edgewater, New Jersey home. It’s a small borough in Bergen County, right across the Hudson River from Manhattan. Imagine waking up every morning to a stunning view of the New York City skyline – that’s what Ice-T gets to do. Edgewater is known for its upscale residential areas and beautiful waterfront properties. It’s a perfect blend of suburban tranquility and urban accessibility, just a short drive away from the bustling streets of NYC.

    Ice-T House

    Ice-T’s house is more than just a place to crash – it’s a testament to his success and a reflection of his taste. This isn’t some flashy mansion that screams “Look at me!” Instead, it’s a sophisticated property that blends luxury with comfort.

    1. Where Is Ice-T’s House?

    Ice-T’s house is located in Edgewater, New Jersey[3]. This borough is known for its stunning views of the Manhattan skyline and its upscale residential areas. The property sits right on the Hudson River, offering breathtaking views of the water and the city beyond. It’s the perfect spot for someone who wants to be close to the action of New York City but still enjoy a bit of peace.

    Ice-T House Features

    2. Features of Ice-T House

    The Ice-T house is a modern architectural marvel. It’s a penthouse apartment that Ice-T and his wife, Coco, have transformed into their dream home[3]. The design is sleek and contemporary, with large windows that make the most of those incredible views. The house spans multiple floors, giving it a spacious feel that’s perfect for entertaining.

    The architectural style is minimalist yet luxurious. Clean lines and open spaces define the interior, while high-end finishes add a touch of glamour. The house is designed to maximize natural light, with floor-to-ceiling windows in many rooms. This not only brightens up the space but also allows Ice-T and his family to enjoy the stunning views from almost every room.

    3. Personal House Touches

    After buying the house, Ice-T and Coco made several improvements to make it truly their own. Here are the top 5:

    1. Custom-designed closets: Ice-T and Coco are known for their unique style, so it’s no surprise they invested in custom closets to house their impressive wardrobe.
    2. Home theater: As an entertainment industry veteran, Ice-T naturally wanted a top-notch home theater system.
    3. Recording studio: Ice-T added a professional-grade recording studio, perfect for when inspiration strikes.
    4. Gym: Staying fit is important to both Ice-T and Coco, so they added a fully-equipped home gym.
    5. Nursery: When their daughter Chanel was born in 2015, they converted one of the rooms into a beautiful nursery.

    4. House Amenities

    • Rooftop terrace
    • Private elevator
    • Gourmet kitchen
    • Multiple bathrooms
    • Walk-in closets
    • Home office
    • Guest suite
    • Laundry room
    • Smart home technology
    • Secure Parking

    5. Neighborhood Area

    Edgewater, where Ice-T’s house is located, is a small but affluent community. It’s known for its beautiful waterfront properties and stunning views of the Manhattan skyline. The area is quiet and residential, offering a peaceful retreat from the hustle and bustle of nearby New York City.

    The neighborhood is home to several parks and recreational areas, perfect for outdoor activities. There’s also a good selection of restaurants and shops along the main street. Many residents appreciate the area for its strong sense of community and excellent schools.

    One of the biggest perks of living in Edgewater is its proximity to New York City. It’s just a short drive or ferry ride away, making it easy for Ice-T to commute to his various work commitments in the city. At the same time, coming home to Edgewater allows him to escape the chaos of city life and enjoy some peace.

    Market Value

    Detail Information
    Build Year Not publicly disclosed
    Purchase Year 2012
    Purchase Value Not publicly disclosed
    Current Estimated Value $11 million[3]

    Ice-T Real Estate Portfolio

    While Ice-T’s main residence is his Edgewater penthouse, he’s had a few other properties over the years. Here’s a quick rundown:

    1. Childhood Home: Ice-T grew up in various places, including New Jersey and Los Angeles. However, details about these childhood homes aren’t widely known.
    2. Previous LA Residence: Before moving to New Jersey, Ice-T lived in Los Angeles for many years. The exact details of this property aren’t public, but it’s likely it was in a nice area of the city given his success in the entertainment industry.
    3. Current Edgewater Penthouse: This is Ice-T’s main residence now. As mentioned earlier, it’s a luxurious penthouse with stunning views of Manhattan.
    4. Other Properties: While there aren’t any confirmed reports of Ice-T owning other properties, he may have made other real estate investments that aren’t public knowledge.

    Ice-T seems to prefer quality over quantity when it comes to real estate. Rather than owning multiple homes, he’s chosen to invest in one spectacular property that suits his lifestyle perfectly.

    Conclusion

    Ice-T’s house in Edgewater, New Jersey, is a perfect reflection of the man himself – stylish, successful, but not overly flashy. With its stunning views, modern amenities, and personal touches, it’s clear that this $11 million penthouse is more than just a house – it’s a home. It’s where Ice-T can relax after a long day on set, spend time with his family, and maybe even work on his next hit track. From the streets of LA to a luxury penthouse overlooking Manhattan, Ice-T’s journey is truly inspiring.

  • 15 Textured Glass Entryway Chandelier That Will Transform Your Home

    15 Textured Glass Entryway Chandelier That Will Transform Your Home

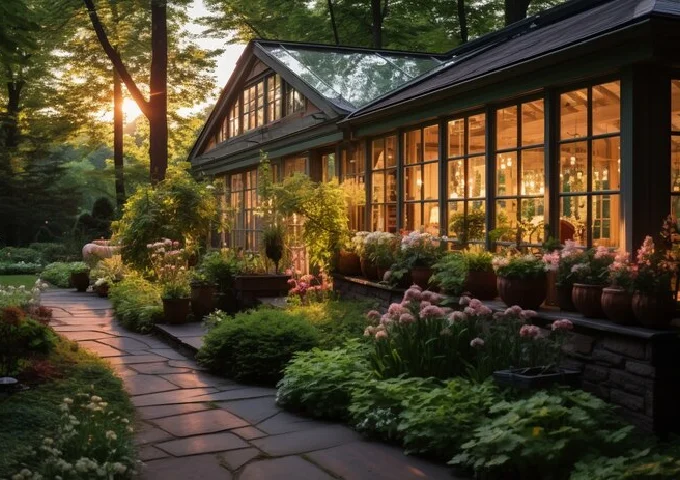
    Are you looking to make a stunning first impression in your home? Well, look no further than a textured glass entryway chandelier! These eye-catching fixtures are all the rage in 2024, combining style and function to create a welcoming atmosphere right from the get-go. With so many options out there, it can be tough to choose the perfect one. But don’t worry – we’ve got you covered with 15 amazing textured glass entryway chandelier ideas that’ll knock your socks off. From frosted orbs to crackle glass tiers, there’s something here for every taste and budget.

    So let’s dive in and explore these dazzling lighting options that’ll make your entryway shine!

    1. Frosted Glass Orb Chandelier

    Frosted Glass Orb Chandelier

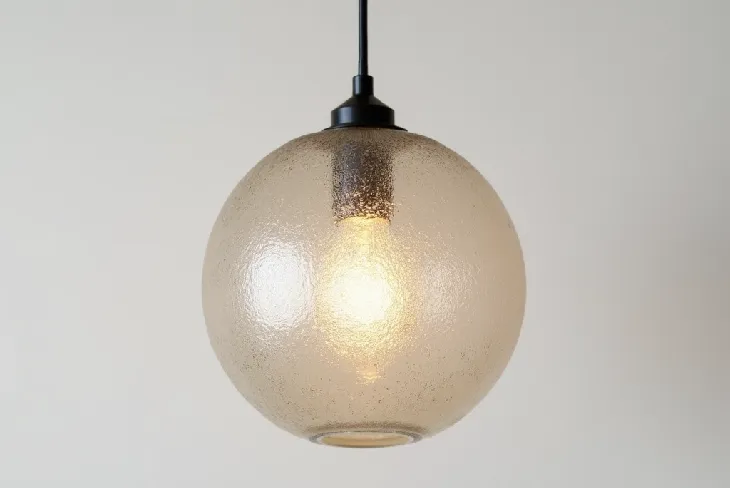
    Frosted glass orb chandeliers are a hot trend, and it’s easy to see why. These beauties add a soft, dreamy glow to any entryway. The frosted finish diffuses light beautifully, creating a warm and inviting atmosphere as soon as you enter the door.

    But what makes these chandeliers so special? Well, for starters, they’re super versatile. You can find them in all sizes and styles, from simple single orbs to elaborate multi-tiered designs. And the best part? They work with pretty much any decor style you can think of.

    Want to make a statement? Go for a large, dramatic orb chandelier that’ll be the first thing guests notice when they walk in. Or, after a more subtle look, try a cluster of smaller frosted orbs at different heights. Either way, you’ll end up with a lighting fixture that’s both functional and fabulous.

    2. Seeded Glass Pendant Cluster

    Seeded Glass Pendant Cluster

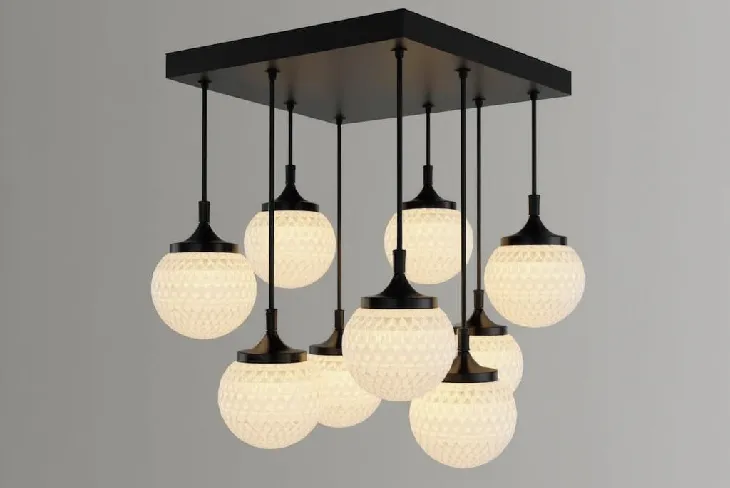
    Next up, we’ve got seeded glass pendant clusters. These babies are like a party for your ceiling! Seeded glass, if you’re wondering, is glass with tiny bubbles trapped inside. It gives the glass a unique, vintage-inspired texture that’s totally on-trend right now.

    When you group a bunch of these seeded glass pendants, magic happens. The result is a chandelier that’s full of character and charm. Each pendant catches the light differently, creating a dazzling display that will impress.

    One of the coolest things about seeded glass pendant clusters is how customizable they are. You can mix and match different shapes and sizes of pendants to create your unique design. Go for a uniform look with all-round pendants, or mix it up with some teardrop shapes thrown in. The possibilities are endless!

    3. Rippled Glass Drum Chandelier

    Rippled Glass Drum Chandelier

    Moving on to something a bit more structured, we’ve got rippled glass drum chandeliers. These bad boys are perfect if you want a textured glass entryway chandelier that’s got a bit more oomph to it.

    Picture this: a cylindrical shade made of rippled glass, casting beautiful patterns of light and shadow all around your entryway. It’s like having your light show every time you flick the switch! The rippled texture adds depth and interest to the fixture, making it way more exciting than your average drum chandelier.

    But don’t think these are just for modern homes. Rippled glass drum chandeliers can work in all sorts of spaces. In a traditional entryway, they add a touch of contemporary flair. In a more modern setting, they fit right in with their sleek, geometric shape. It’s a win-win situation!

    4. Bubble Glass Sputnik Fixture

    Bubble Glass Sputnik Fixture

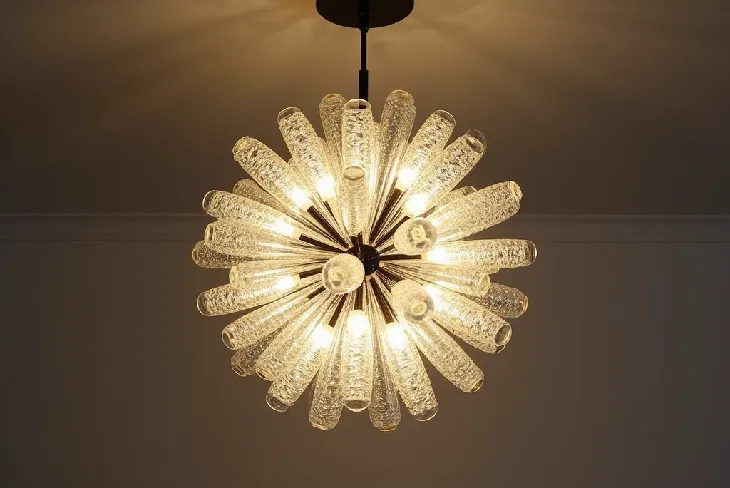
    Now, if you want to make a statement, check out bubble glass Sputnik fixtures. These chandeliers are out of this world – literally! They’re inspired by the Sputnik satellite, with arms radiating out from a central point, each tipped with a bubble of textured glass.

    Bubble glass Sputnik fixtures are like the cool kids of the chandelier world. They’re funky, they’re fun, and they’re not afraid to stand out. The bubble glass adds a playful touch to the otherwise sleek and modern design, creating a perfect balance of whimsy and sophistication.

    One of the best things about these chandeliers is how they play with light. Each glass bubble acts like a mini-lens, scattering light in all directions. The result? A twinkling, star-like effect that’ll make your entryway feel magical. Who wouldn’t want to come home to that every day?

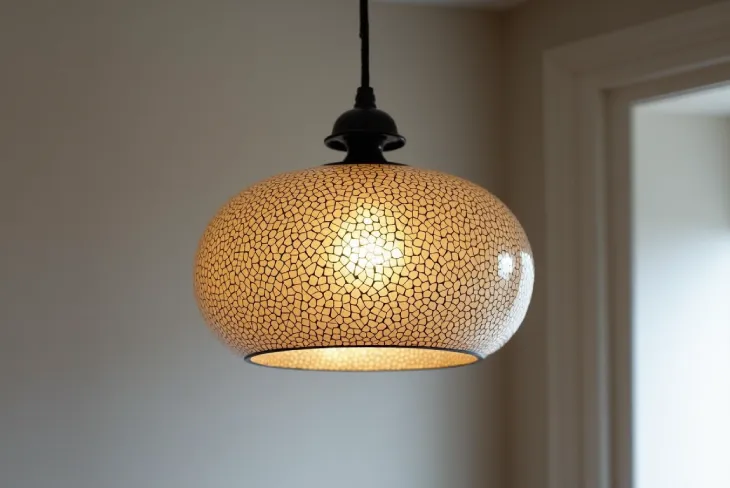
    5. Crackle Glass Tiered Chandelier

    Crackle Glass Tiered Chandelier

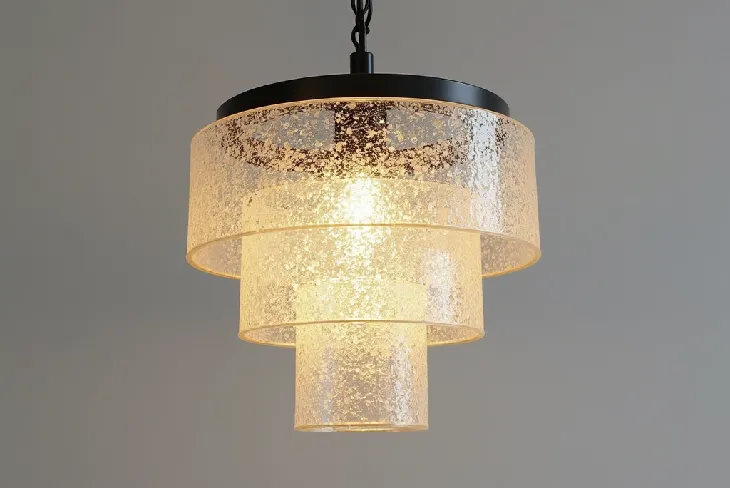
    Let’s talk about crackle glass-tiered chandeliers. These beauties are like the vintage wine of the lighting world – they just get better with age. Crackle glass has a unique, weathered look that adds instant character to any space.

    Imagine walking into your entryway and looking up to see tiers of crackling glass cascading down from the ceiling. It’s like a waterfall of light! The cracks in the glass create fascinating patterns as light shines through, turning your chandelier into a work of art.

    But don’t think these chandeliers are stuck in the past. Modern designs often combine crackle glass with sleek metal finishes for a look that’s both vintage and contemporary. It’s the perfect way to add some old-world charm to your entryway without going full-on antique shop.

    6. Etched Glass Lantern Pendant

    Etched Glass Lantern Pendant

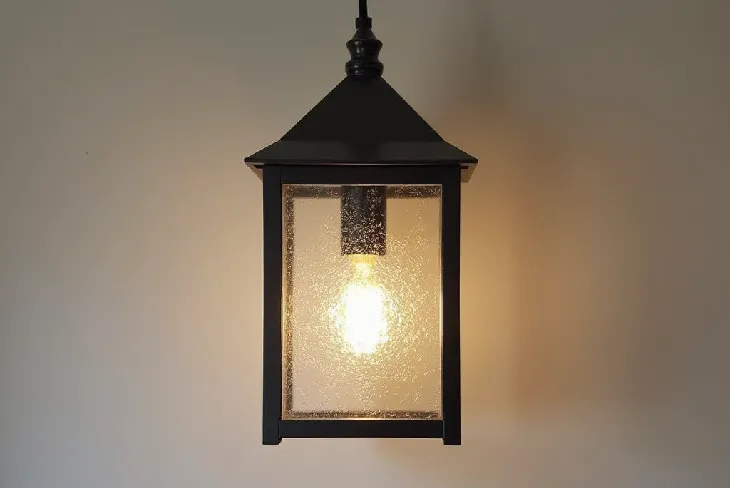
    Next on our list of textured glass entryway chandelier ideas is the etched glass lantern pendant. These fixtures are like the sophisticated cousins of regular lanterns. They’ve got all the charm of a traditional lantern but with an extra dose of elegance thanks to the etched glass.

    Etched glass lantern pendants are perfect for creating a warm, inviting atmosphere in your entryway. The etched patterns on the glass soften the light, creating a gentle glow that’s super flattering (hello, perfect selfie lighting!). Plus, the lantern shape adds a touch of classic style that never goes out of fashion.

    One of the coolest things about these pendants is the variety of etched patterns available. You can find everything from delicate floral designs to bold geometric patterns. It’s a great way to add some personality to your entryway without going overboard.

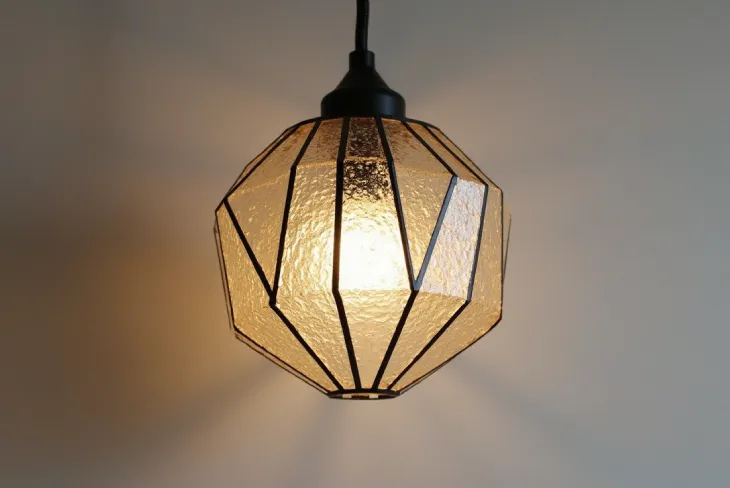
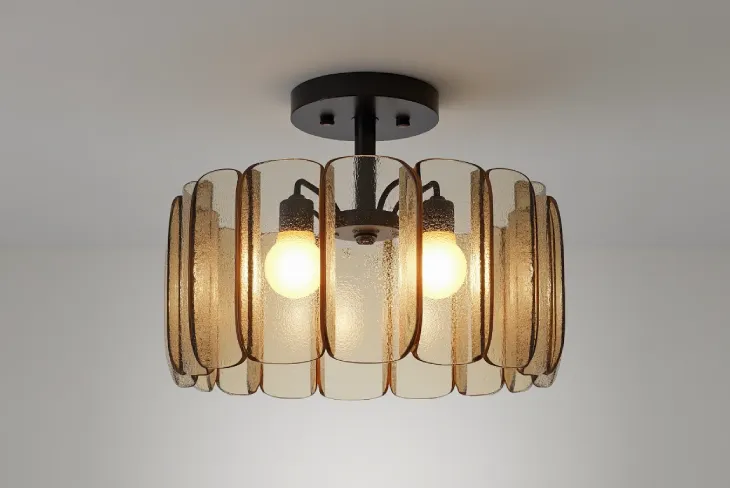
    7. Hammered Glass Globe Chandelier

    Hammered Glass Globe Chandelier

    Moving on to something with a bit more texture, we’ve got hammered glass globe chandeliers. These fixtures are like the bad boys of the chandelier world – they’ve got attitude, and they’re not afraid to show it!

    Hammered glass has a unique, dimpled texture that catches and reflects light in all sorts of interesting ways. When you shape this glass into globes and hang them as a chandelier, the result is nothing short of spectacular. It’s like having a constellation of twinkling stars right there in your entryway.

    But the best part about hammered glass globe chandeliers? They’re surprisingly versatile. The texture adds interest without being overwhelming, so these fixtures can work in all sorts of design styles. Whether your home is rustic, modern, or somewhere in between, a hammered glass globe chandelier can fit right in.

    8. Ombre Textured Glass Cascade

    Ombre Textured Glass Cascade

    If you’re looking for a textured glass entryway chandelier that’s truly unique, check out ombre textured glass cascades. These chandeliers are like a sunset in your entryway – beautiful, colorful, and always changing.

    Ombre, if you’re not familiar, is a gradual blending of one color to another. Now imagine that effect on a series of textured glass pendants, cascading down from your ceiling. Pretty cool, right? The texture of the glass adds depth to the color gradient, creating a truly mesmerizing fixture.

    One of the great things about ombre textured glass cascades is how customizable they are. You can choose colors that complement your decor or go for a bold contrast to make a statement. And because the color changes gradually, these chandeliers can tie together different color schemes in your home. Talk about a multi-tasker!

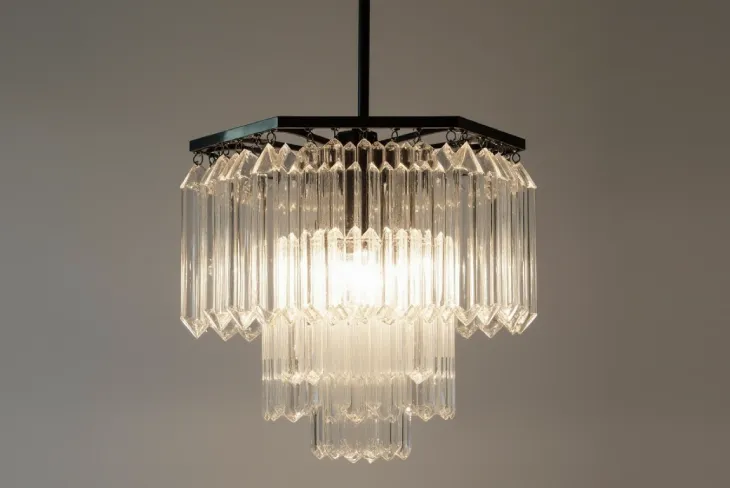
    9. Geometric Faceted Glass Fixture

    Geometric Faceted Glass Fixture

    For those who love clean lines and modern design, geometric faceted glass fixtures are the way to go. These chandeliers are like diamonds for your ceiling – all sparkle and shine, with a cool, contemporary edge.

    Geometric faceted glass fixtures feature glass panels cut into angular shapes, creating a prism-like effect. When light shines through, it’s refracted and reflected in all directions, creating a dazzling display. It’s like having your light show every time you turn on the chandelier!

    But don’t think these fixtures are just for ultra-modern homes. The combination of clean geometric shapes and the warmth of glass can work in all sorts of settings. In a more traditional space, a geometric faceted glass fixture can add a touch of contemporary flair without feeling out of place.

    10. Sandblasted Glass Cylinder Chandelier

    Sandblasted Glass Cylinder Chandelier

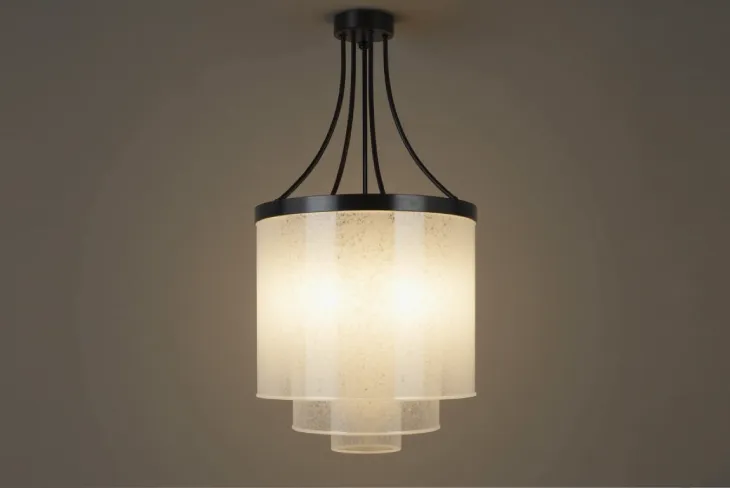
    Next up, we’ve got sandblasted glass cylinder chandeliers. These fixtures are like the cool, calm, and collected members of the chandelier family. They’re not flashy, but they’ve got a quiet elegance that’s hard to beat.

    Sandblasting gives the glass a frosted, matte finish that diffuses light beautifully. When you shape this glass into cylinders and hang them as a chandelier, you get a fixture that’s both stylish and functional. The soft, even glow is perfect for creating a welcoming atmosphere in your entryway.

    One of the best things about sandblasted glass cylinder chandeliers is their versatility. The simple shape and matte finish can work with pretty much any decor style. Plus, you can find them in all sorts of configurations – from single large cylinders to clusters of smaller ones. It’s easy to find one that fits your space perfectly.

    11. Wavy Glass Panel Chandelier

    Wavy Glass Panel Chandelier

    If you’re after something a bit more dynamic, check out wavy glass panel chandeliers. These fixtures are like ocean waves frozen in time – fluid, organic, and captivating.

    Wavy glass panels add movement and interest to a chandelier without being overwhelming. The gentle curves catch and reflect light in fascinating ways, creating patterns of light and shadow that change as you move around the space. It’s like having a living, breathing piece of art in your entryway.

    But the best part about wavy glass panel chandeliers? They’re surprisingly versatile. The organic shapes can soften a modern space, while the clean lines of the panels can add a contemporary touch to a more traditional setting. It’s the best of both worlds!

    12. Pebbled Glass Sphere Cluster

    Pebbled Glass Sphere Cluster

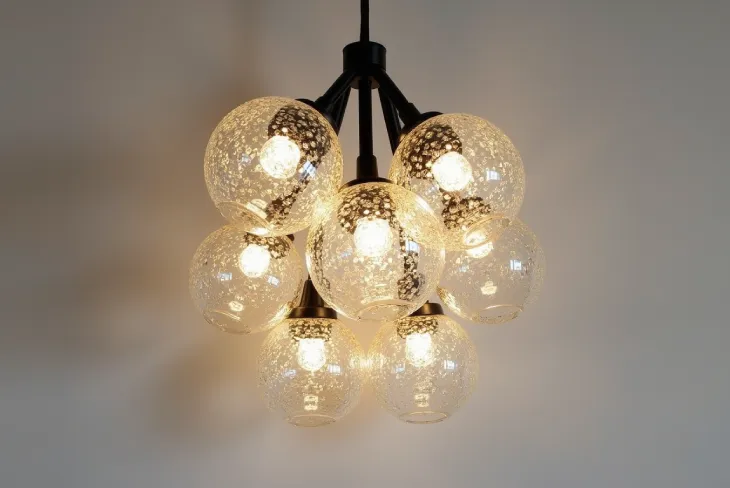
    Moving on to something with a bit more texture, we’ve got pebbled glass sphere clusters. These chandeliers are like a handful of sea glass suspended from your ceiling – natural, organic, and unique.

    Pebbled glass has a bumpy, uneven surface that’s reminiscent of water-worn pebbles. When you shape this glass into spheres and cluster them together as a chandelier, the result is both visually interesting and wonderfully tactile. Each sphere catches and diffuses light differently, creating a soft, varied glow.

    One of the coolest things about pebbled glass sphere clusters is how customizable they are. You can mix and match different sizes of spheres, play with the arrangement, and even incorporate different colors of glass. It’s a great way to create a chandelier that’s truly one-of-a-kind.

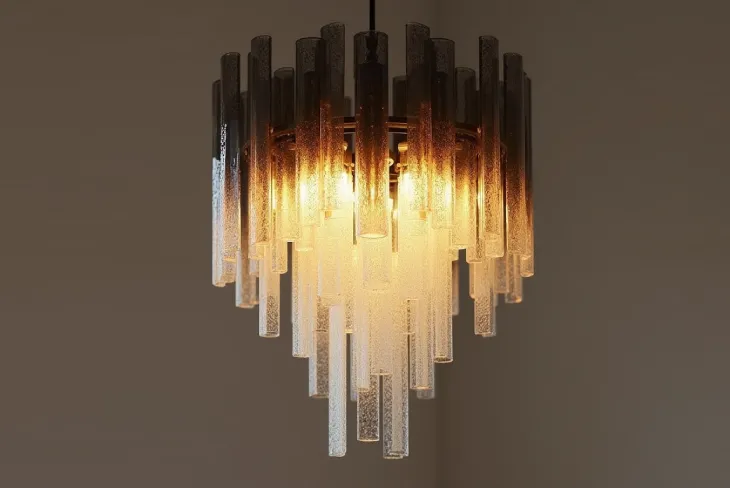
    13. Ribbed Glass Tube Chandelier

    Ribbed Glass Tube Chandelier

    Next on our list of textured glass entryway chandelier ideas is the ribbed glass tube chandelier. These fixtures are like the pin-striped suits of the lighting world – sleek, sophisticated, and undeniably stylish.

    Ribbed glass tubes have a series of parallel ridges running along their length. This texture adds visual interest and depth to the glass, while also affecting how light passes through. The result is a chandelier that’s both visually striking and functionally brilliant at distributing light.

    But don’t think these chandeliers are just for modern spaces. The combination of the classic tube shape and the textured glass can work in all sorts of settings. In a traditional entryway, a ribbed glass tube chandelier can add a touch of contemporary flair without feeling out of place.

    14. Mosaic Glass Disc Pendant

    Mosaic Glass Disc Pendant

    If you’re looking for a textured glass entryway chandelier that’s truly unique, check out mosaic glass disc pendants. These fixtures are like kaleidoscopes for your ceiling – colorful, intricate, and always changing.

    Mosaic glass discs are made up of small pieces of colored glass arranged in patterns. When light shines through, it creates a dazzling display of color and pattern. Hang a few of these discs together as a chandelier, and you’ve got a real showstopper on your hands.

    One of the best things about mosaic glass disc pendants is how customizable they are. You can choose colors and patterns that complement your decor, or go for a bold contrast to make a statement. And because each disc is a work of art in itself, these chandeliers can be appreciated even when they’re not lit.

    15. Ice Crystal Glass Chandelier

    Ice Crystal Glass Chandelier

    Last but not least, we’ve got ice crystal glass chandeliers. These fixtures are like a winter wonderland for your entryway – sparkling, magical, and utterly enchanting.

    Ice crystal glass chandeliers feature glass pieces shaped to resemble icicles or snowflakes. When light shines through, it creates a dazzling, refracted display that’s reminiscent of sunlight on fresh snow. It’s like having a piece of winter magic in your home all year round!

    But don’t think these chandeliers are just for the holiday season. The clear glass and crystalline shapes can work in all sorts of settings and seasons. In a modern space, an ice crystal glass chandelier can add a touch of organic beauty. In a more traditional setting, it can bring a bit of sparkle and glamour.

    Conclusion

    Wow, we’ve covered a lot of ground! From frosted orbs to ice crystals, there’s a textured glass entryway chandelier out there for every style and taste. These fixtures are more than just lights – they’re statement pieces that can transform your entryway from bland to grand.

    Remember, the key to choosing the perfect chandelier is to consider your space, your style, and your lighting needs. Don’t be afraid to go bold and choose something that speaks to you. After all, your entryway is the first thing people see when they enter your home, so why not make it unforgettable?

    So go ahead, and light up your life with one of these amazing textured glass entryway chandeliers. Your home (and your guests) will thank you!

  • 15 Antique Kitchen Design Ideas [Timeless Charm for Modern Homes]

    15 Antique Kitchen Design Ideas [Timeless Charm for Modern Homes]

    Are you dreaming of a kitchen that oozes character and charm? Well, you’re in luck! We’ve got 15 antique kitchen ideas that’ll transport you back in time while still keeping things functional. From vintage cabinetry to retro appliances, these ideas will help you create a space that’s both nostalgic and practical.

    So, let’s dive in and explore how you can bring a touch of the past into your present-day kitchen!

    1. Vintage Cabinetry

    Vintage Cabinetry

    Vintage cabinetry is the heart and soul of any antique kitchen. It’s like stepping into your grandma’s house, but with a modern twist. You can go for reclaimed wood cabinets or even paint your existing ones in a distressed finish. The key is to embrace imperfections – those little nicks and scratches add character!

    Want to take it up a notch? Try adding glass-fronted cabinets to display your favorite dishes. It’s like having your mini museum right in your kitchen. And don’t forget about the hardware – brass or copper knobs and pulls can make your cabinets pop. For an extra touch of authenticity, consider using vintage-style latches or bin pulls on some of your drawers.

    2. Farmhouse Sink

    Farmhouse Sink

    Nothing says “antique kitchen” quite like a farmhouse sink. These big, beautiful basins are perfect for washing large pots and pans. Plus, they look amazing! You can choose from materials like porcelain, copper, or even soapstone. Each material brings its unique character to your kitchen.

    The best part? Farmhouse sinks aren’t just pretty – they’re super practical too. Their deep basin means less splashing, and the front apron adds a touch of elegance to your kitchen. It’s like having a piece of history right at your fingertips. For a truly authentic look, consider a double-bowl farmhouse sink with a decorative divider in the middle.

    3. Retro Appliances

    Retro Appliances

    Who says you can’t mix old and new? Retro appliances are making a big comeback, and for good reason. They add a fun pop of color and personality to your kitchen. Think pastel-colored fridges, vintage-style stoves, and even retro microwaves. Brands like Smeg and Big Chill offer a wide range of retro-inspired appliances that look old but work like new.

    But don’t worry – these appliances aren’t stuck in the past when it comes to functionality. Many brands offer modern features wrapped up in a nostalgic package. It’s the best of both worlds! You can find refrigerators with ice makers and energy-efficient ratings, all disguised in a charming 1950s-style exterior.

    4. Checkerboard Flooring

    Checkerboard Flooring

    Want to make a statement? Checkerboard flooring is the way to go. This classic pattern instantly adds a retro vibe to your kitchen. You can go for the traditional black and white, or mix it up with other colors like cream and terracotta for a softer look.

    And here’s a pro tip: larger tiles can make a small kitchen look bigger. So, if you’re working with limited space, don’t be afraid to go bold with your flooring choice. For a more budget-friendly option, consider vinyl tiles that mimic the look of classic checkerboard patterns. They’re easy to install and maintain, perfect for busy kitchens.

    5. Antique Hutch

    Antique Hutch

    An antique hutch is like a time machine for your kitchen. It’s the perfect place to display your vintage dishes, cookbooks, or family heirlooms. Look for one with a weathered finish to nail that antique look. Hutches with glass doors are particularly charming, allowing you to showcase your prettiest pieces while keeping them dust-free.

    Don’t have an antique hutch? No problem! You can easily transform a modern piece with some paint and distressing techniques. It’s a fun DIY project that’ll give your kitchen some serious vintage vibes. Try using chalk paint for an authentic aged look, and don’t forget to distress the edges and corners for that well-loved appearance.

    6. Pendant Lighting

    Pendant Lighting

    Lighting can make or break a room, and in an antique kitchen, pendant lights are the way to go. Look for fixtures with a vintage feel – think brass, copper, or even milk glass. Schoolhouse-style lights are particularly popular for antique kitchens. These classic fixtures often feature glass globes and simple, elegant designs that complement any vintage-inspired space.

    Remember, lighting isn’t just about function – it’s about creating atmosphere. Soft, warm light can make your kitchen feel cozy and inviting. It’s like having a permanent golden hour in your kitchen! Consider installing dimmer switches to adjust the ambiance throughout the day, from bright and cheery for morning coffee to soft and romantic for evening meals.

    7. Open Shelving

    Open Shelving

    Open shelving is a great way to show off your vintage finds. It’s like having your antique store display right in your kitchen. Plus, it makes grabbing dishes and ingredients a breeze. Open shelves also allow you to easily change up your decor with the seasons or your mood.

    To nail the antique look, try using reclaimed wood for your shelves. And don’t be afraid to mix and match different styles of brackets. The more eclectic, the better! Cast iron brackets can add an industrial touch, while ornate wooden ones can bring in a more traditional feel. Remember to keep your shelves organized and not too cluttered for a clean, vintage-inspired look.

    8. Butcher Block Countertops

    Butcher Block Countertops

    Butcher block countertops are a classic choice for antique kitchens. They’re warm, and inviting, and they age beautifully over time. Each scratch and stain tells a story, making your kitchen truly unique. You can choose from various wood types like maple, oak, or walnut, each bringing its character to your space.

    And the best part? They’re super practical too. You can chop veggies right on the counter, and if they get too scratched up, you can just sand them down and re-oil. It’s like having a built-in cutting board! Just remember to oil your butcher block regularly to keep it looking its best and to prevent water damage.

    9. Subway Tile Backsplash

    Subway Tile Backsplash

    Subway tiles have been around for over a century, and they’re still going strong. They’re simple and classic, and they work with pretty much any kitchen style. For an antique look, try using tiles with a slightly irregular surface or a crackle glaze. This adds depth and character to your backsplash, making it look like it’s been there for decades.

    And don’t feel like you have to stick to white! Soft, muted colors can add depth to your kitchen without overwhelming the space. It’s like adding a subtle watercolor to your kitchen walls. Consider sage green, pale blue, or even a soft yellow for a vintage-inspired look. You can also play with different laying patterns, like herringbone or basketweave, to add visual interest.

    10. Vintage Hardware

    Vintage Hardware

    Sometimes, it’s the little things that make the biggest impact. Vintage hardware can transform ordinary cabinets into something special. Look for pieces with patina – that beautiful aged finish that only comes with time. Brass, copper, and bronze are all great choices for an antique look.

    And here’s a fun idea: mix and match different styles of hardware. It’s like creating a little treasure hunt in your kitchen, with each knob and pull telling its own story. You might combine glass knobs with metal bin pulls, or mix round and square shapes. Just make sure there’s a common element, like color or material, to tie everything together.

    11. Pot Rack

    Pot Rack

    A pot rack isn’t just practical – it’s a great way to show off your collection of vintage cookware. Hang it over your island or stove for easy access and a dash of old-world charm. It’s like having your own culinary chandelier! Choose a rack that complements your other hardware, whether it’s wrought iron, copper, or brass.

    Copper pots are especially beautiful for this purpose. They develop a gorgeous patina over time, adding to that antique feel. Plus, they conduct heat well – it’s a win-win! If you don’t have a full set of copper pots, don’t worry. You can mix in stainless steel or cast iron pieces for a more eclectic look.

    12. Wood-Burning Stove

    Wood-Burning Stove

    Okay, this one’s a bit of a splurge, but if you want to go all-out with the antique theme, a wood-burning stove is the way to go. It’s like having a cozy fireplace right in your kitchen. These stoves come in various styles, from ornate Victorian models to simpler, more rustic designs.

    Modern wood-burning stoves are much more efficient than their ancestors, so you don’t have to sacrifice functionality for style. And imagine the smell of fresh bread baking in a wood-fired oven – it’s like stepping back in time! Just be sure to check local regulations and have proper ventilation installed before adding a wood-burning stove to your kitchen.

    13. Beadboard Paneling

    Beadboard Paneling

    Beadboard paneling is a classic feature in many antique kitchens. It adds texture and interest to your walls without being overwhelming. You can use it as a backsplash, on the sides of an island, or even on the ceiling. Beadboard is relatively easy to install and can be painted to match your kitchen’s color scheme.

    For an extra antique touch, try painting your beadboard in a soft, muted color. It’s like adding a vintage postcard to your kitchen walls. Pale greens, blues, or creams work well for a vintage look. You can also leave it white for a clean, classic appearance that will brighten up your space.

    14. Skirted Cabinets

    Skirted Cabinets

    Skirted cabinets are making a comeback, and we’re here for it! They add a soft, cozy touch to your kitchen and are perfect for hiding away less-than-pretty items. Plus, you can easily change them out when you want a new look. This is a great option if you’re renting or want to update your kitchen without a major renovation.

    Choose a fabric that complements your kitchen’s color scheme. Gingham, toile, or even vintage tea towels can work beautifully. It’s like giving your cabinets a cute little dress! Remember to use a fabric that’s durable and easy to clean, as kitchens can get messy. You might also consider adding a clear plastic cover over the fabric for extra protection.

    15. Antique Accessories

    Antique Accessories

    Last but not least, don’t forget about accessories! Vintage scales, old clocks, antique canisters – these little touches can bring your antique kitchen to life. Hit up flea markets or antique stores to find unique pieces. Look for items that are both decorative and functional to maximize your space.

    And remember, these accessories don’t just have to sit on a shelf. Use that vintage scale to weigh ingredients, or that antique canister to store your flour. It’s like having functional art in your kitchen! Don’t be afraid to mix different eras and styles – an eclectic mix can add depth and personality to your space.

    Conclusion

    There you have it – 15 antique kitchen ideas to inspire your next renovation. Whether you go all-out with a wood-burning stove or just add a few vintage accessories, these ideas will help you create a kitchen that’s full of character and charm. Remember, the key to a great antique kitchen is mixing old and new, practical and pretty. So have fun, get creative, and happy decorating! Your perfect antique-inspired kitchen is just a few changes away.

  • 15 Luxury Kitchen Design Ideas [2025 Trends]

    15 Luxury Kitchen Design Ideas [2025 Trends]

    Are you dreaming of a kitchen that’s both stunning and functional? Well, you’re in luck! Luxury kitchen design ideas are all about creating spaces that wow and work. In 2024, we’re seeing some amazing trends that’ll make your kitchen the star of your home. From bold colors to smart tech, there’s something for everyone. Did you know that 76% of homeowners are planning to renovate their kitchens this year? That’s a lot of people looking for fresh ideas!

    So, let’s dive into 15 luxury kitchen design ideas that’ll transform your cooking space into a masterpiece.

    1. Statement Range Hoods

    Statement Range Hoods

    Gone are the days of boring, hidden range hoods. Now, they’re taking center stage! Statement range hoods are like the crown jewel of luxury kitchens. They’re big, bold, and beautiful. And guess what? They’re not just for show.

    These eye-catching hoods are super functional too. They keep your kitchen smelling fresh and looking clean. You can choose from sleek metals, rustic copper, or even custom-made designs. Some folks are even painting their hoods to match their cabinets or walls.

    Want to make a real statement? Go for a sculptural hood that looks like a piece of art. It’ll be a conversation starter for sure!

    2. High-Gloss Cabinetry

    High-Gloss Cabinetry

    Shiny, shiny, shiny! High-gloss cabinets are making a big comeback in luxury kitchens. They’re like mirrors for your kitchen, reflecting light and making the space feel bigger and brighter.

    These cabinets come in all sorts of colors. White is classic and clean, but don’t be afraid to go bold. Deep blues, rich greens, and even black are trending. The best part? They’re super easy to clean. Just a quick wipe, and they’re sparkling again.

    But remember, high gloss isn’t for everyone. If you’re not into fingerprints, you might want to stick to matte finishes. Still, for that ultra-modern, luxe look, nothing beats the shine of high-gloss.

    3. Monolithic Kitchen Islands

    Monolithic Kitchen Islands

    Bigger is better when it comes to kitchen islands in 2024. We’re talking massive, monolithic structures that dominate the space. These islands are like the Swiss Army knife of kitchens – they do it all!

    Imagine a huge slab of marble or quartz, stretching out before you. It’s not just a prep space; it’s a dining area, a workspace, and a social hub all in one. Some of these islands even have built-in appliances like cooktops or sinks.

    The key to making this work? Keep the design simple and sleek. Let the size and material of the island speak for itself. It’s a bold move, but in a luxury kitchen, it’s a showstopper.

    4. Smart Integrated Appliances

    Smart Integrated Appliances

    Welcome to the future! Smart appliances are taking luxury kitchens to the next level. We’re not just talking about fridges that order milk (though that’s cool too). We’re talking about fully integrated, high-tech cooking experiences.

    Picture this: ovens that you can preheat from your phone, coffee makers that have your latte ready when you wake up, and dishwashers that can be voice-controlled. It’s all about making your life easier and your cooking more precise.

    But here’s the real luxury – these smart appliances are designed to blend seamlessly into your kitchen. No more bulky, obvious tech. It’s all hidden behind beautiful panels that match your cabinetry.

    5. Eco-Friendly Materials

    Eco-Friendly Materials

    Going green is the new black in luxury kitchens. More and more people are choosing eco-friendly materials that look great and help the planet. It’s a win-win!

    We’re seeing a lot of recycled glass countertops, sustainable wood cabinets, and even flooring made from reclaimed materials. These aren’t just good for the environment; they add unique textures and stories to your kitchen.

    And let’s not forget about energy-efficient appliances. They’re not just saving the planet; they’re saving you money on bills too. Luxury doesn’t have to come at the cost of the environment.

    6. Dramatic Lighting Fixtures

    Dramatic Lighting Fixtures

    Lights, camera, action! Dramatic lighting fixtures are turning luxury kitchens into works of art. We’re talking big, bold, and beautiful pieces that demand attention.

    Oversized pendant lights above islands are super popular. They’re like jewelry for your kitchen. But don’t stop there. Mix it up with different types of lighting. Under-cabinet LEDs, statement chandeliers, and even color-changing bulbs can create different moods.

    The key is to layer your lighting. Combine task lighting for cooking with ambient lighting for the atmosphere. And don’t forget about natural light! Big windows or skylights can make your kitchen feel even more luxurious.

    7. Hidden Pocket Doors

    Hidden Pocket Doors

    Now you see it, now you don’t! Hidden pocket doors are the magic trick of luxury kitchens. They’re perfect for creating flexible spaces that can change in an instant.

    Imagine being able to close off your messy prep area when guests arrive, or open up your kitchen to the dining room for big parties. These doors slide right into the wall, disappearing when you don’t need them.

    But here’s the cool part – when closed, they can look just like part of the wall. It’s like having secret rooms in your kitchen. How’s that for a luxury touch?

    8. Marble and Stone Surfaces

    Marble and Stone Surfaces

    Marble, granite, quartz – oh my! Luxury kitchens are all about natural stone surfaces in 2024. They’re durable and beautiful, and each piece is unique.

    Marble is the classic choice, with its elegant veining and timeless appeal. But don’t overlook other options. Quartzite is tough as nails and comes in some amazing patterns. And engineered quartz gives you the look of natural stone with extra durability.

    The trend is to go big with these materials. We’re seeing entire backsplashes, countertops, and even walls covered in matching stone. It’s a bold look that screams luxury.

    9. Open Shelving Displays

    Open Shelving Displays

    Show off your stuff! Open shelving is still going strong in luxury kitchens. It’s a great way to display your fancy dishes, cookbooks, or that expensive olive oil you brought back from Italy.

    But in 2024, we’re seeing a twist on this trend. Instead of just plain shelves, people are getting creative. Think floating shelves with hidden lighting, or industrial-style metal shelving units.

    The key to making open shelving look luxurious? Curate what you display. Keep it organized and choose items that are both functional and beautiful. It’s like creating little works of art all around your kitchen.

    10. Bold Color Palettes

    Bold Color Palettes

    Bye-bye, all-white kitchens! Luxury is all about color in 2024. We’re seeing rich, deep hues that add drama and personality to kitchens.

    Navy blue is having a moment, especially paired with gold hardware. But don’t be afraid to go even bolder. Emerald green, deep purple, or even black can look amazing in the right kitchen.

    The trick is to balance these bold colors with neutral tones. Maybe you have colorful lower cabinets with white uppers or a bright island with neutral surroundings. It’s all about creating a look that’s uniquely you.

    11. Multifunctional Kitchen Islands

    Multifunctional Kitchen Islands

    Islands are getting a makeover in luxury kitchens. They’re not just for prep work anymore. These new islands are multitasking marvels!

    We’re seeing islands with built-in seating, hidden storage, and even appliances. Some have raised or lowered sections for different tasks. Others have pull-out tables for extra dining space.

    The goal is to make your island work harder for you. It’s like having an extra room in your kitchen. And with beautiful materials and smart design, it’ll look amazing too.

    12. Fluted Stonework

    Fluted Stonework

    Texture is taking center stage in luxury kitchens, and fluted stonework is leading the charge. This isn’t your grandma’s kitchen – it’s a modern twist on a classic look.

    Fluted panels add depth and interest to walls, islands, and even appliance fronts. They catch the light in interesting ways, creating shadows and highlights that change throughout the day.

    The best part? Fluted stonework works with any style. It can be sleek and modern or warm and traditional. It’s all in how you use it. Pair it with smooth surfaces for contrast, or go all out with fluted everything for a bold, textured look.

    13. Brass and Metallic Accents

    Brass and Metallic Accents

    Everything that glitters is gold in luxury kitchens this year – or brass, or copper, or chrome! Metallic accents are adding sparkle and shine to kitchens everywhere.

    We’re seeing brass faucets, gold light fixtures, and even metallic tiles. These shiny touches add warmth and glamour to any kitchen. They work especially well with darker color palettes, creating a rich, luxurious feel.

    But don’t go overboard. The key is to use these metallic accents sparingly. Think of them like jewelry for your kitchen – a little goes a long way.

    14. Biophilic Design Elements

    Biophilic Design Elements

    Bring the outdoors in! Biophilic design is all about connecting with nature, and it’s a big trend in luxury kitchens for 2024.

    This could mean big windows that look out onto gardens, or skylights that let in natural light. But it’s not just about views. We’re seeing living walls with herbs or decorative plants, natural wood elements, and even water features in some high-end kitchens.

    The goal is to create a space that feels connected to the natural world. It’s not just beautiful – studies show that biophilic design can reduce stress and improve wellbeing. Now that’s luxury!

    15. Minimalist Aesthetics

    Minimalist Aesthetics

    Less is more in some of the most luxurious kitchens of 2024. Minimalist design is all about clean lines, uncluttered spaces, and a focus on function.

    In these kitchens, everything has its place – usually hidden behind sleek, handleless cabinets. Appliances are integrated seamlessly into the design. Countertops are clear of clutter, with just a few carefully chosen decorative items on display.

    But minimalist doesn’t mean boring. These kitchens often use high-quality materials and interesting textures to add depth and interest. It’s luxury in its purest form.

    Conclusion

    Wow, we’ve covered a lot of ground! From bold colors to smart tech, 2024 is shaping up to be an exciting year for luxury kitchen design. Remember, the key to a truly luxurious kitchen is making it work for you. Mix and match these ideas to create a space that’s both beautiful and functional.

    Whether you’re planning a full renovation or just want to update your current kitchen, there’s something here for everyone. So go ahead, dream big! Your perfect luxury kitchen is waiting to be created.

  • 15 Narrow Bathroom Design Ideas [2025 Space-Saving Trends]

    15 Narrow Bathroom Design Ideas [2025 Space-Saving Trends]

    Are you struggling with a cramped bathroom? Don’t worry! Narrow bathroom design ideas are here to save the day. In 2024, homeowners are getting creative with their small spaces, turning them into stylish and functional retreats. Did you know that the average bathroom size in the US is just 40 square feet? That’s not much room to work with!

    But with these 15 clever ideas, you’ll be amazed at how spacious your narrow bathroom can feel. Let’s dive in and explore some game-changing solutions that’ll make your tiny bathroom feel like a luxurious spa.

    1. Half-Wall Shower with Glass Partition

    Half-Wall Shower with Glass Partition

    Want to open up your narrow bathroom? Try a half-wall shower with a glass partition. It’s a smart way to separate your shower area without closing off the space. The glass lets light flow through, making your bathroom feel bigger and brighter.

    The half-wall provides privacy and contains water splashes, while the glass partition keeps the visual space open. It’s perfect for narrow bathrooms where a full shower enclosure might feel cramped.

    Plus, it’s a modern look that’s on-trend. You can customize the half-wall height to suit your needs, and even add a built-in shelf for your shower essentials. Consider using waterproof materials like tiles or a solid surface for the half-wall to ensure durability and easy maintenance.

    2. Wall-Mounted Floating Vanity

    Wall-Mounted Floating Vanity

    Floating vanities are a game-changer for narrow bathrooms. They’re mounted directly on the wall, which frees up floor space and makes your bathroom look bigger. It’s like magic for small spaces!

    These vanities create an illusion of more floor space, making your bathroom feel less cramped. You can easily clean underneath them, which is a bonus for maintaining a hygienic bathroom.

    Choose a slim design with built-in storage to maximize functionality. Look for models with soft-close drawers and water-resistant finishes for added durability. And don’t forget to add a stylish mirror above to complete the look!

    3. Corner Sink Installation

    Corner Sink Installation

    Do you have an awkward corner in your narrow bathroom? Put it to work with a corner sink! This smart solution uses space that often goes to waste. It’s perfect for those super tight bathrooms where every inch counts.

    Corner sinks free up wall space for other fixtures or storage, allowing you to make the most of your limited area. Unique designs can add character to your bathroom, turning a functional necessity into a stylish focal point.

    Look for sleek, modern designs or vintage-inspired corner sinks to match your style. Some corner sinks even come with built-in storage or shelving, providing extra space for toiletries. You’ll be surprised at how much difference this small change can make in opening up your narrow bathroom!

    4. Vertical Tile Patterns

    Vertical Tile Patterns

    Want to make your narrow bathroom feel taller? Vertical tile patterns are your new best friend. They draw the eye upward, creating an illusion of height. It’s a simple trick that can transform your space.

    Vertical tiles make ceilings appear higher, giving your bathroom a more spacious feel. They add visual interest without cluttering the space, which is crucial in a narrow bathroom.

    Try long, slim tiles or traditional subway tiles installed vertically. Mix and match colors or stick to a monochrome scheme for a sleek look. Consider using tiles with a slight sheen or gloss finish to reflect light and further enhance the sense of space.

    5. Integrated Lighting Solutions

    Integrated Lighting Solutions

    Good lighting is crucial in a narrow bathroom, and integrated solutions are the way to go. Think of built-in LED strips, backlit mirrors, or recessed lighting. These options provide great illumination without taking up precious space.

    Integrated lighting eliminates the need for bulky light fixtures, keeping your bathroom sleek and uncluttered. You can create different moods with dimmable options, perfect for a relaxing bath or an energizing morning routine.

    Consider adding lighting under floating vanities or along shower niches for a luxe touch. LED strip lights can be installed in unexpected places, like along the base of a vanity or around a mirror, to create a soft, ambient glow.

    6. Wet Room Layout

    Wet Room Layout

    Ever heard of a wet room? It’s a bathroom where the whole space is waterproofed, and the shower isn’t enclosed. This layout is perfect for narrow bathrooms because it eliminates the need for a separate shower area.

    Wet rooms make the bathroom feel more spacious by removing visual barriers. They’re easier to clean with no shower doors or curtains to deal with, which is a big plus in a small space.

    Just make sure to slope the floor slightly towards the drain and use non-slip tiles for safety. Consider adding a rainfall showerhead for an extra touch of luxury. You can also incorporate a sleek glass panel to prevent water from splashing onto the toilet or vanity area.

    7. Custom Built-In Storage

    Custom Built-In Storage

    In a narrow bathroom, every inch counts. That’s where custom built-in storage comes in handy. Think recessed shelves, built-in cabinets, and clever nooks. These solutions provide storage without eating into your floor space.

    Custom storage utilizes wall space efficiently, making use of areas that might otherwise go unused. You can design it to fit your specific needs, whether that’s extra towel storage or a spot for your skincare products.

    Consider adding a tall, slim cabinet for towels, or building shelves into the wall above the toilet. Get creative with your storage to maximize space! Hidden storage behind mirrors or under bench seating can also be a great way to keep your narrow bathroom clutter-free.

    8. Frameless Shower Enclosure

    Frameless Shower Enclosure

    If you prefer an enclosed shower, go for a frameless design. These sleek enclosures use heavy-duty glass with minimal hardware. The result? A shower that barely looks like it’s there!

    Frameless showers create a seamless look that opens up the space. They’re easier to clean than traditional framed showers, which is a big plus in a small bathroom.

    Choose clear glass for maximum openness, or go for frosted glass if you want more privacy. Either way, it’s a stylish choice for narrow bathrooms that can make your space feel larger and more luxurious.

    9. Wall-to-Wall Bench Seating

    Wall-to-Wall Bench Seating

    Who says you can’t have seating in a narrow bathroom? A wall-to-wall bench is a smart addition that serves multiple purposes. It provides a place to sit, extra storage, and can even house plumbing for a sink or toilet.

    Bench seating adds functionality without taking up floor space. You can use it for storage by adding drawers or lift-up seats, perfect for hiding away towels or bath products.

    Choose waterproof materials like teak or a solid surface for durability. You can even add cushions for extra comfort! This feature creates a cohesive, built-in look that can make your narrow bathroom feel more spacious and well-designed.

    10. Backlit Mirrors

    Backlit Mirrors

    Backlit mirrors are a fantastic way to add style and function to your narrow bathroom. They provide even, flattering light and create depth, making your space feel larger.

    These mirrors eliminate shadows, which is great for applying makeup or shaving. They add a luxurious, high-end feel to your bathroom and can serve as both task and ambient lighting.

    Look for mirrors with built-in defoggers for added convenience. This small luxury makes a big impact in a narrow space, enhancing your bathroom’s functionality and aesthetic appeal.

    11. Compact Wall-Hung Toilet

    Compact Wall-Hung Toilet

    Wall-hung toilets are a space-saving miracle for narrow bathrooms. They’re mounted directly on the wall, with the tank hidden behind it. This design frees up valuable floor space and creates a sleek, modern look.

    These toilets make cleaning the floor easier and take up less visual space, making the bathroom feel larger. You can adjust the height for comfort, which is great for households with different needs.

    Plus, they come in various styles to match any decor. It’s a practical choice that doesn’t sacrifice style, perfect for maximizing space in a narrow bathroom while maintaining a contemporary aesthetic.

    12. Vertical Striped Wallpaper

    Vertical Striped Wallpaper

    Remember how vertical tiles make a room feel taller? Vertical striped wallpaper does the same thing! It’s a bold choice that can transform your narrow bathroom into a stylish oasis.

    Vertical stripes create an illusion of height, making your bathroom feel more spacious. They add personality without cluttering the space, which is crucial in a narrow bathroom.

    Go for thin stripes for a subtle effect, or bold, wide stripes for a dramatic look. Just make sure to use moisture-resistant wallpaper designed for bathrooms. This simple design trick can greatly impact how spacious your narrow bathroom feels.

    13. Floor-to-ceiling Mirrors

    Floor-to-ceiling Mirrors

    Want to double the visual space in your narrow bathroom instantly? Floor-to-ceiling mirrors are the answer. They reflect light and create an illusion of depth, making your bathroom feel twice as big.

    Large mirrors make the space feel more open and airy. They bounce light around, brightening up the room and making it feel larger than it is.

    Consider mirroring an entire wall or using large mirror panels strategically. This simple change can make a huge difference in the perceived size of your narrow bathroom. Plus, it’s practical for getting ready in the morning!

    14. Sliding Barn Door

    Sliding Barn Door

    Traditional swing doors can be a problem in narrow bathrooms. That’s where sliding barn doors come in handy. They’re stylish, space-saving, and add a touch of rustic charm to your bathroom.

    Sliding doors don’t take up floor space when open, which is crucial in a narrow bathroom. They add a decorative element to your bathroom and can be a real focal point.

    Opt for a frosted glass barn door for privacy while still letting light through. It’s a functional and fashionable solution for tight spaces that can make your narrow bathroom feel more open and stylish.

    15. Monochromatic Color Scheme

    Monochromatic Color Scheme

    Last but not least, consider a monochromatic color scheme for your narrow bathroom. Using different shades of the same color creates a cohesive look that makes the space feel larger and more unified.

    A monochrome palette creates a sense of continuity, making the space feel bigger. It’s easy to accessorize and change up over time, giving you flexibility in your decor.

    Choose light colors for a bright, airy feel, or go dark for a cozy, intimate vibe. Either way, it’s a foolproof way to make your narrow bathroom feel more spacious and put-together.

    Conclusion

    There you have it! Fifteen fantastic narrow bathroom design ideas that prove small can be stylish. From clever storage solutions to optical illusions, these tips will help you make the most of your compact space.

    Remember, the key is to think vertically, use light wisely, and choose fixtures that maximize space. With a little creativity, your narrow bathroom can become your favorite room in the house. So go ahead, and start planning your bathroom makeover today!

  • 15 Farmhouse Bathroom Ideas [2025 Trends]

    15 Farmhouse Bathroom Ideas [2025 Trends]

    Looking for farmhouse bathroom ideas to transform your space? You’re in luck! Farmhouse-style bathrooms are all the rage in 2024, blending rustic charm with modern comfort. A recent survey found that 73% of homeowners wanted to spend more time in their homes after remodeling their bathrooms.

    So, let’s dive into 15 fantastic farmhouse bathroom ideas that’ll make your space cozy, stylish, and oh-so-inviting!

    1. Shiplap Walls

    Shiplap Walls

    Shiplap walls are a must-have for any farmhouse bathroom. They’re like the bread and butter of rustic decor! These horizontal wooden boards add texture and character to your space. And guess what? They’re not just pretty to look at. Shiplap can protect your walls from moisture, which is super important in a bathroom.

    To get the look, you can use real wood or go for moisture-resistant MDF boards. They come in various colors, but white is a classic choice. It’ll make your bathroom feel bright and airy. Plus, it’s a great backdrop for other farmhouse elements.

    Want to mix things up? Try vertical shiplap instead. It can make your ceiling look higher and your bathroom feel bigger. Now that’s a win-win!

    2. Freestanding Bathtub

    Freestanding Bathtub

    Nothing says “farmhouse chic” quite like a freestanding bathtub. It’s like having your spa right at home! These tubs are the perfect centerpiece for any farmhouse bathroom. They come in all sorts of styles, from classic clawfoot to sleek modern designs.

    White is a popular color choice, but don’t be afraid to go bold. A copper or black tub can make a real statement. And here’s a fun fact: freestanding tubs aren’t just pretty. They’re easier to clean around than built-in ones. Talk about form and function!

    Remember to consider your bathroom’s size when choosing a tub. You want it to be the star of the show, not a space hog.

    3. Black Hardware Accents

    Black Hardware Accents

    Black hardware is like the little black dress of farmhouse bathrooms. It goes with everything and never goes out of style! Think faucets, drawer pulls, towel racks, and even light fixtures. These dark accents create a beautiful contrast against light-colored walls and fixtures.

    The best part? Black hardware is super versatile. It works with both modern and rustic farmhouse styles. And it’s not just about looks. Black finishes are often more durable and hide water spots better than shiny chrome or brass.

    Don’t want to go all-in on black? Try mixing metals for a more eclectic look. A little black here, a little brass there – it’s all about finding what works for you!

    4. Vintage Sink Vanity

    Vintage Sink Vanity

    A vintage sink vanity is like a time machine for your bathroom. It instantly adds character and charm! Look for old dressers or sideboards that you can repurpose. With a little DIY magic, you can turn them into one-of-a-kind vanities.

    These vintage pieces often have beautiful details like carved wood or intricate hardware. They’re a great way to add warmth and texture to your bathroom. And the best part? They usually offer plenty of storage space for all your bathroom essentials.

    If you’re not into the DIY route, don’t worry. Many companies now make new vanities that look vintage. You get the best of both worlds – old-school charm with modern convenience!

    5. Barn Door

    Barn Door

    Barn doors aren’t just for, well, barns anymore! They’re a fantastic addition to any farmhouse bathroom. These sliding doors are both functional and stylish. They save space compared to traditional swinging doors, which is great for smaller bathrooms.

    You can go for a rustic look with reclaimed wood, or choose a more polished style with painted wood. And don’t forget about the hardware! Big, black metal tracks and handles add to that farmhouse feel.

    Barn doors are also great for creating privacy in an open-concept bathroom. Use them to separate the toilet area or to close off the entire bathroom. It’s like having a secret hideaway in your own home!

    6. Metal-Wire Baskets

    Metal-wire baskets are the unsung heroes of farmhouse bathroom storage. They’re practical, stylish, and oh-so-versatile! Use them to store towels, toiletries, or even plants. You can hang them on the wall, stack them on shelves, or tuck them under the sink.

    These baskets come in all sorts of finishes. Galvanized metal gives a true farmhouse feel, while black or brass finishes offer a more modern touch. And here’s a pro tip: line them with burlap or linen for a softer look and to keep small items from falling through.

    The best part about metal-wire baskets? They let you see what’s inside. No more rummaging around for that missing hairbrush or face cream!

    7. Antique Mirrors

    Antique Mirrors

    Antique mirrors are like windows to the past. They add instant charm and character to any farmhouse bathroom. Look for mirrors with ornate frames or interesting shapes. The more weathered, the better!

    These mirrors aren’t just decorative. They can also make your bathroom feel bigger and brighter by reflecting light. And don’t worry if you can’t find a true antique. Many stores sell new mirrors with an aged look.

    Want to make a statement? Try grouping several smaller antique mirrors on one wall. It’s like creating your art gallery!

    8. Stone Sinks

    Stone Sinks

    Stone sinks bring a piece of nature right into your bathroom. They’re like having your own personal rock formation! These sinks come in all sorts of materials, from granite to marble to river rock. Each one is unique, with its patterns and textures.

    Stone sinks are super durable and easy to clean. They’re also great at hiding water spots and soap scum. And talk about a conversation starter! Your guests will be impressed.

    Remember, stone sinks can be heavy. Make sure your vanity is strong enough to support the weight. And consider pairing your stone sink with a waterfall faucet for a truly spa-like experience.

    9. Wood Beam Ceiling

    Wood Beam Ceiling

    Wood beam ceilings are like the cherry on top of a farmhouse bathroom sundae. They add warmth, texture, and a touch of rustic charm. These beams can be real structural elements or faux beams added for decoration.

    Dark wood beams look great against white ceilings, creating a beautiful contrast. But don’t be afraid to go lighter if that fits your style better. And here’s a fun idea: use the beams to hang light fixtures or plants for an extra farmhouse touch.

    If your bathroom has high ceilings, wood beams can help make the space feel cozier. It’s like giving your bathroom a big, warm hug!

    10. Farmhouse-Style Light Fixtures

    Farmhouse-Style Light Fixtures

    Lighting can make or break a room, and farmhouse-style fixtures are the perfect way to illuminate your bathroom. Think lantern-style sconces, Edison bulb pendants, or even repurposed mason jars as light covers. These fixtures add character and create a warm, inviting glow.

    Black or oil-rubbed bronze finishes are popular choices for farmhouse lighting. They pair well with other rustic elements in the room. And don’t forget about the bulbs! Soft, warm light is more flattering and relaxing than harsh, cool light.

    Want to add some drama? Consider a chandelier over the bathtub. It’s unexpected and luxurious!

    11. Subway Tile

    Subway Tile

    Subway tile is like the little black dress of bathroom design. It’s classic, versatile, and never goes out of style. While traditional white subway tile is always a safe bet, don’t be afraid to mix things up. Try different colors, patterns, or even textures.

    For a true farmhouse look, consider using subway tile with a slightly irregular or handmade appearance. These imperfections add character and charm. And here’s a pro tip: dark grout can make your tile pattern pop and is easier to keep clean.

    Subway tile isn’t just for walls. Use it in the shower, as a backsplash, or even on the floor. It’s like a blank canvas for your farmhouse creativity!

    12. Rustic Wooden Ladder

    A rustic wooden ladder is like a Swiss Army knife for bathroom decor. It’s functional, stylish, and oh-so-versatile! Use it to hang towels, store baskets, or even as a unique shelving unit. The more weathered and worn the ladder, the better.

    These ladders add vertical interest to your bathroom and can make the space feel taller. They’re also great for small bathrooms where floor space is at a premium. Just lean it against the wall and voila – instant storage!

    Don’t have an old ladder lying around? No problem! Many home decor stores sell new ladders with a distressed finish. Or, if you’re feeling crafty, try making your own!

    13. Copper Accents

    Copper Accents

    Copper accents are like jewelry for your bathroom. They add a warm, rich glow that’s simply irresistible. Think copper sinks, faucets, light fixtures, or even just small decorative items. As copper ages, it develops a beautiful patina that adds to its charm.

    One of the great things about copper is how well it pairs with other materials. It looks stunning against wood, stone, or even crisp white surfaces. And it’s not just pretty – copper is naturally antimicrobial, making it a great choice for bathroom fixtures.

    Want to dip your toe in the copper trend without committing to big fixtures? Try copper wire baskets or a copper-framed mirror. It’s an easy way to add a touch of warmth and luxury to your farmhouse bathroom.

    14. Vintage Clawfoot Tub

    Vintage Clawfoot Tub

    A vintage clawfoot tub is like a time machine for your bathroom. It instantly transports you to a bygone era of luxury and relaxation. These tubs are deep, comfortable, and oh-so-stylish. Plus, they’re often the focal point of any bathroom they’re in.

    While white is a classic choice, don’t be afraid to go bold with your clawfoot tub. A black or copper finish can make a real statement. And don’t forget about the feet! They come in all sorts of styles and finishes to match your decor.

    One thing to keep in mind: clawfoot tubs can be heavy. Make sure your bathroom floor can support the weight. But trust us, it’s worth it for the spa-like experience you’ll get every time you take a bath!

    15. Woven Natural Fiber Baskets

    Woven Natural Fiber Baskets

    Woven natural fiber baskets are like a warm hug for your bathroom decor. They add texture, warmth, and a touch of nature to your space. Use them to store towels and toilet paper, or even as planters for bathroom-friendly greenery.

    These baskets come in all sorts of materials – seagrass, rattan, jute, you name it. Each one has its unique texture and color. And the best part? They’re super versatile. You can use them on shelves, under the sink, or even hang them on the wall.

    Natural fiber baskets are also a great way to add some eco-friendly style to your bathroom. They’re often sustainably made and biodegradable. It’s like giving Mother Nature a high five while you decorate!

    Conclusion

    There you have it – 15 fantastic farmhouse bathroom ideas to inspire your next remodel. From shiplap walls to woven baskets, these elements can transform your bathroom into a cozy, stylish retreat. Remember, farmhouse style is all about mixing old and new, rustic and refined. So don’t be afraid to experiment and make it your own!

    Whether you’re going for a full renovation or just want to add a few farmhouse touches, these ideas are sure to get your creative juices flowing. So go ahead, roll up your sleeves, and start creating the farmhouse bathroom of your dreams. After all, a bathroom remodel can increase your home’s value by up to 58%! Now that’s something to get excited about.

  • How to Design a Stately English Manor Under Budget

    How to Design a Stately English Manor Under Budget

    Design a Stately English Manor without breaking the bank! Ever thought about living in a grand manor like the ones in English countryside tales? You might think it’s only possible with a hefty budget, but that’s not true. With some clever planning and a bit of creativity, you can bring that stately charm to your home. Did you know that many people are now transforming their spaces into mini-manors by using smart design tricks?

    Let’s dive into how you can achieve this elegant style without spending a fortune.

    Overview of English Manor Design

    When we talk about English manor design, we’re thinking about elegance, history, and a touch of luxury. These homes are known for their large rooms, high ceilings, and classic details. Imagine walking into a room with a grand fireplace, beautiful wooden beams on the ceiling, and large windows that let in plenty of light. That’s the essence of an English manor.

    But don’t worry if your home isn’t as big as an actual manor. The key is to capture the feel of these homes by focusing on certain design elements. Think about using rich colors like deep reds and greens, adding wooden furniture with intricate carvings, and maybe even hanging some vintage portraits on the walls. It’s all about creating a space that feels both grand and cozy at the same time.

    Benefits of English Manor Design

    Why choose to design your home like an English manor? Well, there are several benefits to this style:

    • Elegance and Timelessness: An English manor style is classic. It never goes out of fashion because it’s rooted in history. This means your home will always look stylish and sophisticated.
    • Spacious Feel: Even if your home is small, using design elements from manors can make it feel larger. High ceilings, large windows, and open spaces are all part of this style.
    • Comfort and Warmth: Despite their grandeur, manors are designed to be comfortable. Think of cozy fireplaces and plush furniture that invite you to relax.
    • Versatility: You can mix traditional elements with modern touches to make it uniquely yours. This blend can make your home both functional and beautiful.

    Design a Stately English Manor
    Steps to Achieve English Manor Design Under Budget

    Transforming your home into an English manner doesn’t have to cost a lot. Here’s how you can do it:

    1. Planning and Research

    Start by immersing yourself in the world of English manor design. Gather ideas and inspiration from various sources. Look at pictures of real manors in magazines or online. If possible, visit historical homes or museums that showcase this style. Pay close attention to the colors, furniture styles, and decorative elements they use.

    Make a detailed list of what you love most about these spaces. Is it the rich wood paneling? The ornate fireplaces? The luxurious fabrics? Once you have your list, prioritize the elements that are most important to you. This will help you focus your budget on the areas that will make the biggest impact.

    Don’t forget to measure your spaces carefully. Knowing the exact dimensions of your rooms will help you plan furniture placement and avoid costly mistakes when purchasing items.

    2. Choosing Cost-Effective Materials

    You don’t need expensive materials to get the look. Use wallpaper with classic patterns instead of costly wall panels. Opt for laminate flooring that mimics wood or stone instead of real hardwood or marble.

    3. Maximizing Space and Efficiency

    Use mirrors to make rooms appear larger and brighter. Arrange furniture in ways that open up space rather than cluttering it. Choose multi-functional pieces like ottomans with storage.

    4. Affordable Décor and Finishes

    Shop at thrift stores or online marketplaces for vintage furniture and décor items. A coat of paint or new upholstery can transform old pieces into something special.

    5. Focusing on Efficiency and Sustainability

    Consider energy-efficient windows and insulation to keep your home warm without high costs. Look for second-hand materials when possible to save money and help the environment.

    Common Mistakes to Avoid

    Here are some pitfalls to watch out for:

    • Overcrowding Spaces: Don’t fill every corner with furniture or décor. English manors are known for their spaciousness, so leave room to breathe.
    • Ignoring Lighting: Proper lighting is key to creating the right ambiance. Use a mix of overhead, task, and accent lighting to create warmth and depth.
    • Mismatching Styles: While eclectic can be charming, stick to one overall theme to avoid a chaotic look. Mix periods carefully for a curated feel.
    • Skipping Maintenance: Regular upkeep is crucial for maintaining the elegant look. Plan for routine cleaning and touch-ups to keep everything looking fresh.
    • Neglecting the Budget: Always keep track of your expenses to avoid overspending. It’s easy to get carried away, so maintain a detailed budget spreadsheet.
    • Forgetting About Comfort: Don’t sacrifice comfort for style. Ensure your furniture is not only beautiful but also comfortable and functional.
    • Overlooking Details: Small touches like quality hardware on cabinets or well-chosen switch plates can make a big difference in the overall look.

    Budget Breakdown

    Here’s a simple budget breakdown for designing an English manor-style home:

    Item Estimated Cost
    Paint & Wallpaper $200 – $500
    Flooring $500 – $1,500
    Furniture (second-hand) $300 – $1,000
    Décor & Accessories $150 – $400
    Lighting $100 – $300
    Miscellaneous $200

    Can I DIY this design?

    Absolutely! Many elements of the English manor style can be achieved through DIY projects, which not only save money but also allow you to put a personal touch on your space. Here are some DIY ideas you can tackle:

    • Painting walls and ceilings to create the perfect backdrop for your manor-inspired rooms.
    • Refurbishing old furniture with new paint, stain, or upholstery to fit your design scheme.
    • Creating your curtains or throw pillows using elegant fabrics.
    • Installing faux wood beams on ceilings to add architectural interest.
    • Building a faux fireplace surround to create a focal point in a room.
    • Crafting your artwork or framing vintage book pages for wall decor.

    Remember, DIY projects can be fun and rewarding, but they also require time and patience. Start with smaller projects and work your way up to more complex ones as you gain confidence and skills.

    Conclusion

    Designing a stately English manor doesn’t have to remain a distant dream due to budget constraints. By carefully selecting materials, planning efficiently, and incorporating DIY projects, you can create a beautiful space that reflects the timeless elegance of an English manor without overspending. Remember, the key is to focus on the elements that matter most to you and to be creative with your resources. With some patience and ingenuity, you can transform your home into a space that exudes the charm and sophistication of a classic English manor, all while staying within your budget. So go ahead, start planning, and watch as your home becomes the stately retreat you’ve always dreamed of.

  • How to Build a Beautiful Hill Country Home Under Budget

    How to Build a Beautiful Hill Country Home Under Budget

    Build a Beautiful Hill Country Home—sounds like a dream, doesn’t it? Imagine waking up to the serene views of rolling hills and lush greenery right outside your window. But, when you think about building such a home, the first thing that probably comes to mind is the cost. Well, here’s a surprising fact: you can build a stunning hill country home without breaking the bank. In this article, we’ll explore how you can achieve this dream by understanding the design, benefits, and steps to keep it affordable.

    Let’s dive into how you can make your dream home a reality!

    Overview of Hill Country Home Style

    Hill country homes are all about blending with nature. They often feature natural materials like stone and wood, which help them fit seamlessly into the landscape. These homes typically have large windows to take advantage of the beautiful views and let in plenty of natural light. The design is often rustic yet elegant, with open floor plans that create a sense of spaciousness and connection to the outdoors.

    This style is perfect for those who love nature and want a home that feels like part of the environment. With their simple yet sophisticated design, hill country homes are becoming increasingly popular among those looking for a peaceful retreat away from the hustle and bustle of city life. The use of earthy tones and textures makes these homes warm and inviting, creating a cozy atmosphere that feels both timeless and modern.

    Benefits of Hill Country Home Design

    There are several benefits to choosing a hill country home design:

    • Natural Beauty: These homes are designed to complement their surroundings, making them perfect for scenic locations. The integration with nature not only enhances aesthetic appeal but also promotes a sense of tranquility and relaxation.
    • Energy Efficiency: The use of natural materials and strategic window placement can help reduce energy costs by maximizing natural light and insulation. This means lower utility bills and a smaller carbon footprint.
    • Open Spaces: The open floor plans create a spacious feel, ideal for families or those who love entertaining. This layout encourages social interaction and flexibility in how spaces are used.
    • Sustainability: Many hill country homes use sustainable materials and building practices, which is great for the environment. By choosing eco-friendly options, homeowners can enjoy their beautiful homes while also doing their part for the planet.

    Beautiful Hill Country Home Design

    Steps to Achieve Hill Country Home Design Under Budget

    Building your dream home doesn’t have to be expensive. Here are some steps to help you build a beautiful hill country home on a budget:

    1. Planning and Research

    Start by doing thorough research. Look into different designs, materials, and builders. It’s important to have a clear vision of what you want before starting any construction. Compare prices and get quotes from multiple builders to ensure you’re getting the best deal. Also, consider visiting existing hill country homes for inspiration and practical insights.

    2. Choosing Cost-Effective Materials

    Opt for materials that are both affordable and durable. Reclaimed wood or recycled metal can give your home a rustic look without costing too much. Prefabricated panels are another great option as they can be assembled quickly, reducing labor costs. Additionally, consider local materials that might be cheaper due to reduced transportation costs.

    3. Maximizing Space and Efficiency

    Design your home with efficiency in mind. Open floor plans not only look great but also save on construction costs by using fewer walls. Consider multi-purpose rooms that can serve different functions without needing extra space. For example, a guest room that doubles as an office or playroom can maximize utility without adding square footage.

    4. Affordable Décor and Finishes

    You don’t need expensive décor to make your home look beautiful. Simple finishes like polished concrete floors or basic cabinetry can be both stylish and budget-friendly. Focus on key areas like the kitchen or living room where small upgrades can make a big impact. Incorporate DIY projects for personal touches that add character without high costs.

    5. Focusing on Efficiency and Sustainability

    Incorporate energy-efficient features like solar panels or high-quality insulation. These might have an upfront cost but will save money in the long run by reducing utility bills. Sustainable practices not only help the environment but also add value to your home. Consider water-saving fixtures or rainwater harvesting systems as additional eco-friendly options.

    Common Mistakes to Avoid

    When building your hill country home, watch out for these common mistakes:

    • Choosing the Wrong Builder: Always check references and past work before hiring.
    • Ignoring Land Suitability: Make sure your land is suitable for building and matches your design needs.
    • Underestimating Costs: Unexpected expenses can arise; always have a buffer in your budget.
    • Skipping Permits: Ensure all necessary permits are obtained to avoid legal issues.
    • Overlooking Details: Small details can make a big difference in the final look of your home.

    Budget Breakdown

    Here’s a simple breakdown of potential costs when building your hill country home:

    Construction Phase Average Cost
    Land Purchase $3,000 – $150,000
    Excavation $3,000
    Foundation $9,260
    Roofing $13,760
    Rough Lumber $16,000
    Heating & Ducting $7,260
    Plumbing $18,260
    Electrical Wiring $8,000
    Interior Finishing $11,760
    Driveway & Walkway $6,000

    These figures are estimates and can vary based on location and specific design choices.

    Can I DIY This Design?

    Yes, you can take on some parts of building your hill country home yourself! DIY projects like painting or landscaping can save money and add a personal touch. However, it’s important to know your limits—tasks like electrical work or plumbing should be left to professionals for safety reasons.

    If you’re handy with tools and have some experience in construction, you might even consider taking on more significant parts of the build under professional guidance. Just remember that while DIY can save money, it also requires time and effort. Planning and breaking projects into manageable tasks will help keep everything on track.

    Conclusion

    Building a beautiful hill country home under budget is entirely possible with careful planning and smart choices. By focusing on efficient designs, cost-effective materials, and sustainable practices, you can create a stunning home that fits both your dreams and your budget.

  • How to Plan a Functional Territorial Home Under Budget

    How to Plan a Functional Territorial Home Under Budget

    Planning a functional territorial home on a budget? You’re in the right place! Let’s dive into how you can create a cozy, efficient living space without breaking the bank. Territorial homes, with their blend of Southwestern charm and practical design, offer a unique opportunity to build a home that’s both beautiful and budget-friendly.

    So, grab a cup of coffee, and let’s explore how to make your dream home a reality without emptying your wallet.

    Overview of Territorial Home Design

    Territorial homes are a real gem in the world of architecture. They’re like a warm hug from the Southwest, combining the best of Spanish Colonial and Native American styles. These homes are all about thick walls, flat roofs, and simple, clean lines. But don’t let that simplicity fool you – they’re packed with character!

    Imagine walking into a home where every room feels spacious and airy, thanks to high ceilings and large windows. The walls are thick, keeping the heat out in summer and the warmth in during winter. It’s like the house is giving you a big, comfy blanket all year round. And the best part? These homes are designed to work with the environment, not against it.

    Territorial homes often have covered porches or patios, perfect for sipping your morning coffee or watching the sunset. Inside, you’ll find exposed wooden beams, adobe walls, and maybe even a cozy fireplace. It’s like stepping into a slice of history, but with all the modern comforts you need.

    Benefits of Territorial Home Design

    Now, why should you consider a territorial home? Well, buckle up, because the benefits are pretty awesome!

    First off, these homes are energy-efficient superstars. Those thick walls we talked about? They’re like nature’s air conditioner, keeping your home cool in summer and warm in winter. This means lower energy bills – and who doesn’t love saving money?

    Territorial homes are also super durable. They’re built to last, using materials that can stand up to whatever Mother Nature throws their way. This means less maintenance and repairs in the long run. Ka-ching! More savings!

    But it’s not just about the practical stuff. Territorial homes have a timeless charm that never goes out of style. They blend in beautifully with the landscape, making you feel like your home truly belongs. And because they’re so adaptable, you can easily add your personal touch without messing up the overall style.

    Plus, if you’re into sustainable living, territorial homes are right up your alley. They often use local, eco-friendly materials and can be designed to make the most of natural light and ventilation. It’s like giving Mother Earth a high-five while creating your dream home!

    Functional Territorial Home Design

    Steps to Achieve Territorial Home Design Under Budget

    Ready to make your territorial home dreams come true without emptying your piggy bank? Here’s the game plan: we’ll break it down into bite-sized steps that’ll help you create a stunning home without the jaw-dropping price tag. From smart planning to clever material choices, we’ve got you covered. Let’s roll up our sleeves and get started!

    1. Planning and Research

    First things first, let’s get our ducks in a row with some solid planning and research. This step is like laying the foundation for your dream home – get it right, and everything else will fall into place.

    Start by hitting the books (or the internet). Learn everything you can about territorial home design. Look at pictures, read articles, and maybe even take a virtual tour of some territorial homes. The more you know, the better decisions you’ll make.

    Next, grab a notebook and start jotting down your must-haves and nice-to-haves. Do you need three bedrooms or will two do? Is a big kitchen a deal-breaker? This wish list will help you focus on what’s important.

    Now, let’s talk money. Set a realistic budget and stick to it like glue. Remember, it’s not just about building costs – factor in things like permits, landscaping, and furnishings too. It’s better to overestimate than be caught short!

    Don’t forget to check local building codes and regulations. The last thing you want is to start building only to find out you’re breaking some obscure rule. A quick chat with your local planning department can save you a ton of headaches down the road.

    2. Choosing Cost-Effective Materials

    Alright, let’s talk materials. This is where you can really stretch your budget without compromising on style or quality. Territorial homes are all about using what’s available locally, so let’s channel that spirit!

    Adobe is a classic choice for territorial homes. It’s mud and straw, so it’s super cheap and eco-friendly. Plus, it’s great for insulation. If traditional Adobe is too labor-intensive, look into modern Adobe blocks or even Adobe-like materials that give the same look with less hassle.

    Concrete is another budget-friendly option. It’s durable, versatile, and can be molded into various shapes. You can even add pigments to get that earthy, territorial look.

    For roofing, consider metal. It might cost a bit more upfront, but it lasts forever and can help with energy efficiency. Plus, it fits right in with the territorial style.

    Wood is great for beams, doors, and window frames. Look for reclaimed wood to save money and add character. You might even find some cool, weathered pieces that fit perfectly with the territorial vibe.

    Don’t forget about flooring. Concrete or tile can be both affordable and authentic. If you’re set on wood, consider engineered wood flooring – it’s cheaper than solid wood but looks just as good.

    Remember, it’s not just about choosing cheap materials. It’s about finding the sweet spot between cost, durability, and style. Sometimes spending a bit more on quality materials can save you money on maintenance in the long run.

    3. Maximizing Space and Efficiency

    Now, let’s talk about making every square inch count. In a territorial home, efficiency isn’t just about saving energy – it’s about creating a space that works for you without wasting resources.

    Start with the layout. Open floor plans are your friend here. They make your home feel bigger and allow for better air circulation. Plus, they’re super flexible – you can change things up without knocking down walls.

    Think vertically too. High ceilings are a hallmark of territorial homes, so use that height! Install tall bookshelves, hang artwork high, or add a loft space for extra storage or a sleeping area.

    Built-in storage is a game-changer. Window seats with hidden compartments, under-stair storage, or built-in shelving can help you maximize space without cluttering up your rooms.

    When it comes to windows, go big. Large windows are typical in territorial homes and they serve multiple purposes. They let in lots of natural light (saving on electricity), provide ventilation, and make your spaces feel larger.

    Don’t forget about outdoor living spaces. A covered patio or porch is like adding an extra room to your home without the hefty price tag. It’s perfect for entertaining or just relaxing with a good book.

    Finally, consider multi-functional spaces. A guest room that doubles as a home office, or a dining area that can be converted into a play space. The more flexible your rooms are, the more value you get out of your square footage.

    4. Affordable Décor and Finishes

    Time to add some personality to your territorial home without emptying your wallet! The key here is to keep things simple and authentic.

    Start with color. Earthy tones like terracotta, sand, and sage green are perfect for territorial homes. Paint is cheap and can completely transform a space. Go for a warm, neutral base and add pops of color with accessories.

    Speaking of accessories, this is where you can have fun without spending a fortune. Look for Southwestern-inspired textiles like colorful rugs, blankets, or throw pillows. You can often find these at thrift stores or flea markets for a steal.

    For wall art, consider making your own. Framed vintage maps, pressed botanicals, or even your photographs can create stunning, personal displays. Or go for a gallery wall with a mix of frames – it’s a great way to fill a large wall on a budget.

    Lighting is crucial in setting the mood. Look for wrought iron fixtures or simple ceramic lamps. You can often find these second-hand and give them a quick makeover with some spray paint.

    When it comes to furniture, think sturdy and simple. Wooden pieces with clean lines work well. Don’t be afraid to mix and match – a cohesive color scheme will tie everything together.

    Remember, in a territorial home, less is often more. A few well-chosen pieces will have more impact than a room full of clutter. Focus on quality over quantity, and let the beautiful simplicity of the territorial style shine through.

    5. Focusing on Efficiency and Sustainability

    Let’s talk about making your territorial home not just beautiful, but smart and eco-friendly too. The good news? Many of these features can save you money in the long run!

    Start with insulation. Remember those thick walls? Make sure they’re well-insulated. It might cost a bit more upfront, but you’ll thank yourself when your energy bills come in. Consider using recycled or natural materials like cellulose or wool for extra green points.

    For heating and cooling, think of passive solar design. Position your home to make the most of the sun’s warmth in winter and shade in summer. Overhanging roofs or pergolas can provide shade when you need it most.

    Water conservation is a big deal in territorial homes. Install low-flow fixtures and consider a rainwater harvesting system. Native, drought-resistant landscaping not only looks great but also saves on water bills.

    When it comes to appliances, go for energy-efficient models. They might cost a bit more initially, but they’ll save you money over time. Look for the ENERGY STAR label when shopping.

    Don’t forget about lighting. LED bulbs use way less energy than traditional ones and last much longer. Plus, they come in warm tones that fit perfectly with the territorial aesthetic.

    Finally, consider adding some smart home features. A programmable thermostat, for example, can help you manage your energy use more efficiently. You can start small and add more features as your budget allows.

    Common Mistakes to Avoid

    When planning your territorial home, watch out for these pitfalls:

    1. Skimping on insulation
    2. Ignoring local building codes
    3. Choosing trendy over timeless design
    4. Overlooking the importance of proper ventilation
    5. Underestimating the project timeline
    6. Forgetting to plan for future needs
    7. Neglecting outdoor living spaces
    8. Over-complicating the design
    9. Choosing materials solely based on price
    10. Failing to get proper permits

    Budget Breakdown

    Here’s a rough guide to help you allocate your budget:

    Category Percentage of Total Budget
    Land 20-25%
    Construction 50-60%
    Design and Engineering 8-10%
    Permits and Fees 3-5%
    Landscaping 5-7%
    Furnishings and Décor 5-10%

    Can I DIY this design?

    Thinking about rolling up your sleeves and DIYing your territorial home? Well, you’re in for an adventure! While some aspects of territorial home design can be DIY-friendly, others might need a pro’s touch.

    You can tackle things like painting, some basic carpentry, and decorating. If you’re handy, you might even be able to handle some of the finishing work like tiling or installing fixtures. And landscaping? That’s a great DIY project that can save you a bundle.

    But when it comes to the core structure, electrical work, plumbing, and major systems like heating and cooling, it’s best to leave those to the professionals. Not only is it safer, but it also ensures everything’s up to code.

    If you’re set on being heavily involved in the build, consider acting as your general contractor. This way, you can manage the project and do some of the work yourself, while bringing in experts for the trickier bits. Just remember, it’s a big job that requires a lot of time and know-how. But if you’re up for the challenge, it can be an incredibly rewarding experience!

    Conclusion

    Planning a functional territorial home on a budget isn’t just possible – it can be an exciting and rewarding journey. By focusing on smart design, efficient use of space, and cost-effective materials, you can create a home that’s both beautiful and affordable. Remember, the key is to stay true to the territorial style while making choices that work for your lifestyle and budget. With some creativity and careful planning, you’ll soon be enjoying your very own slice of Southwestern paradise. Happy building!

  • How to Create a Cozy Garden Home Under Budget

    How to Create a Cozy Garden Home Under Budget

    Creating a cozy garden home is an exciting project that can transform your outdoor space into a welcoming retreat. Imagine stepping into your backyard and feeling like you’ve entered a serene oasis, all without breaking the bank. The good news is, you don’t need to spend a fortune to achieve this. With some creativity and planning, you can create a cozy garden home that reflects your style and meets your needs. Whether you have a sprawling yard or a small patio, there are plenty of budget-friendly ways to make your garden feel like an extension of your home.

    Overview of Cozy Garden Home Design

    A cozy garden home design focuses on creating an inviting outdoor space that feels like an extension of your indoor living area. This style typically includes comfortable seating, lush greenery, and personal touches that make the space uniquely yours. The goal is to create a space where you can relax, entertain, and enjoy nature’s beauty. It’s about blending functionality with aesthetics to create a harmonious environment. You might incorporate elements like outdoor rugs, string lights, and potted plants to enhance the ambiance. The key is to use what you have creatively and add new elements thoughtfully.

    Benefits of Cozy Garden Home Design

    Creating a cozy garden home offers numerous benefits beyond just aesthetics. First and foremost, it provides a peaceful retreat where you can unwind after a long day. Spending time in nature has been shown to reduce stress and improve mental health[4]. A well-designed garden can also increase your home’s curb appeal and potentially its value[4]. Additionally, having an outdoor space for entertaining can enhance your social life by providing a venue for gatherings with family and friends. Finally, gardening itself can be a rewarding hobby that promotes physical activity and creativity.

    Cozy Garden Home Design

    Steps to Achieve Cozy Garden Home Design Under Budget

    Transforming your garden into a cozy retreat doesn’t have to be expensive. Here’s how you can do it:

    1. Planning and Research

    Start by envisioning what you want your garden to look like. Consider how you’ll use the space—whether for relaxing, entertaining, or gardening—and plan accordingly. Research different design ideas and gather inspiration from magazines or online platforms like Pinterest. Make a list of must-have features and prioritize them based on your budget.

    2. Choosing Cost-Effective Materials

    Opt for materials that offer durability without high costs. For example, gravel is an affordable option for pathways[6], while reclaimed wood can be used for furniture or planters[6]. Look for sales or discounts at local hardware stores or online marketplaces.

    3. Maximizing Space and Efficiency

    Even small gardens can feel spacious with the right layout. Use vertical space by installing shelves or hanging planters[6]. Choose multi-functional furniture that serves more than one purpose, such as benches with storage underneath.

    4. Affordable Décor and Finishes

    Incorporate inexpensive décor items like string lights or solar lamps to add warmth[7]. DIY projects can also save money; consider painting old pots or creating homemade bird baths from terracotta pots[3].

    5. Focusing on Efficiency and Sustainability

    Sustainability is not only good for the planet but can also save you money in the long run. Use native plants that require less water[5] and install rain barrels to collect water for irrigation.

    Common Mistakes to Avoid

    • Overcrowding plants without considering their mature size[5].
    • Ignoring soil conditions before planting[5].
    • Skipping regular maintenance tasks.
    • Choosing materials that aren’t weather-resistant.
    • Forgetting about lighting for evening use.

    Budget Breakdown

    Here’s a simple budget breakdown for creating your cozy garden home:

    Item Estimated Cost
    Gravel for Pathways $50
    Reclaimed Wood Furniture $100
    Plants (Native Varieties) $75
    Lighting (String Lights) $30
    DIY Décor Projects $20

    Can I DIY this design?

    Absolutely! Creating a cozy garden home is perfect for DIY enthusiasts. Many elements of this design can be achieved with basic tools and some creativity. From building simple furniture pieces with reclaimed wood to crafting decorative items like planters or bird baths, there are countless projects you can tackle yourself[3][6]. Not only does DIY save money, but it also allows you to personalize your space exactly how you want it.

    Conclusion

    Creating a cozy garden home under budget is entirely possible with some planning and creativity. By focusing on cost-effective materials, maximizing space efficiently, and incorporating sustainable practices, you can transform your outdoor area into a beautiful retreat without overspending. Remember to avoid common mistakes like overcrowding plants or neglecting maintenance needs, which can lead to additional costs down the line.