Blog

  • 15 Kitchen Lighting Ideas ‘Brighten Your Culinary Space’

    15 Kitchen Lighting Ideas ‘Brighten Your Culinary Space’

    Are you ready to light up your kitchen like never before? Kitchen lighting ideas are more than just about seeing what you’re cooking. They can transform your space from dull to dazzling! Did you know that good lighting can make your kitchen look up to 30% bigger? That’s right! As of 2024, homeowners are focusing more on creative lighting solutions to enhance their cooking spaces.

    Let’s dive into 15 kitchen lighting ideas that’ll make your kitchen the star of your home. From practical to pretty, we’ve got something for everyone.

    So, grab a cup of coffee, and let’s explore how to brighten up your culinary world!

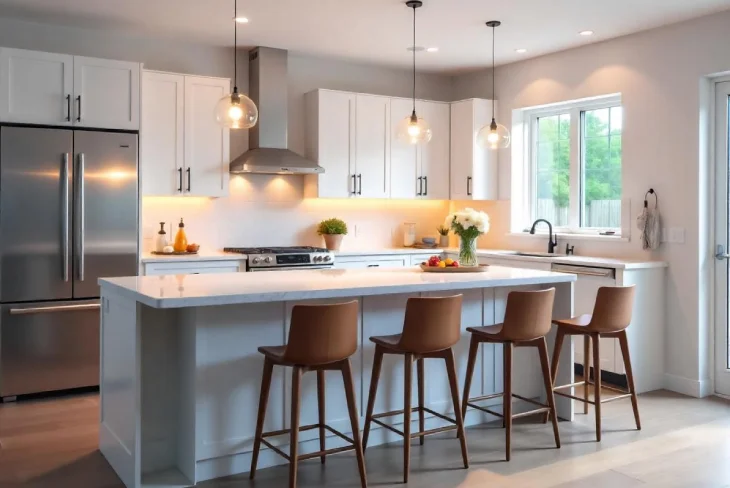
    1. Pendant Lights Over Kitchen Island

    Pendant lights are like jewelry for your kitchen island. They’re not just pretty; they’re super useful too! Hanging these lights over your island can create a focal point that draws the eye. Plus, they provide great task lighting for food prep or homework time.

    You can choose from all sorts of styles. There are sleek, modern ones that look like they’re from the future. Or, you might like rustic, farmhouse-style pendants that add a cozy touch. The best part? You can adjust how low they hang to fit your space perfectly.

    Remember, odd numbers often look best. Try hanging three pendants over a long island for a balanced look. It’s an easy way to add some wow factor to your kitchen!

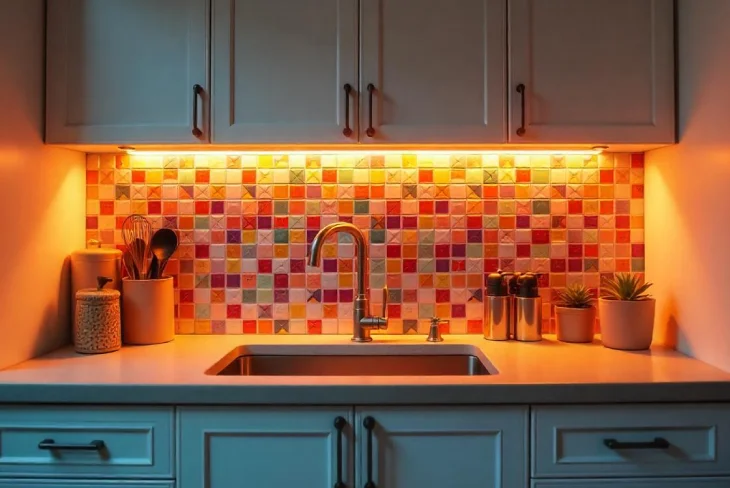
    2. Under-Cabinet LED Strips

    Under-cabinet LED strips are like having a secret weapon in your kitchen lighting arsenal. They’re thin, easy to install, and pack a big punch when it comes to brightening up your workspace. These lights tuck neatly under your cabinets, out of sight but not out of mind.

    LED strips are great because they don’t take up any extra space. They light up your countertops, making it easier to chop veggies or read recipes. Plus, they create this cool, floating effect for your cabinets at night. It’s like your kitchen is giving you a warm, welcoming glow!

    Many LED strips come with dimmers or even color-changing options. So, you can set the mood for a late-night snack or early-morning coffee. It’s a simple addition that can make a big difference in how you use and enjoy your kitchen.

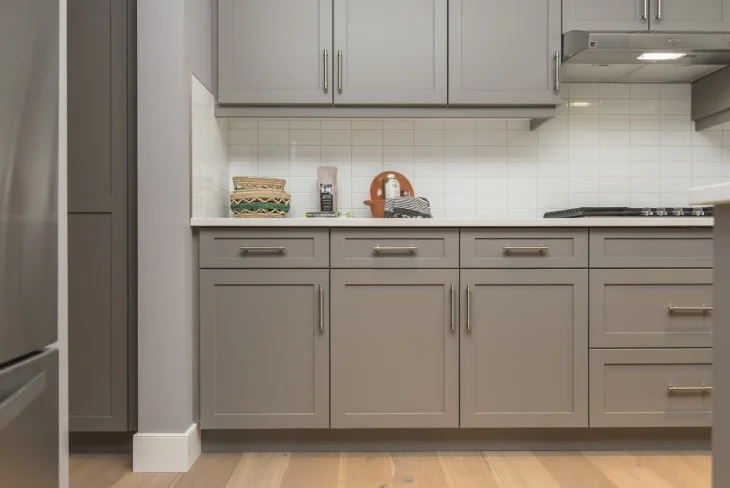
    3. Recessed Ceiling Lights

    Recessed ceiling lights are like the ninjas of kitchen lighting. They’re there, doing their job, but you hardly notice them. These lights sit flush with your ceiling, creating a clean, streamlined look. They’re perfect for kitchens with lower ceilings or for folks who don’t want fixtures hanging down.

    One of the coolest things about recessed lights is how versatile they are. You can put them pretty much anywhere in your kitchen. Over the sink? Check. Above the stove? You bet. Around the edges of the room? Absolutely! They provide even, overall lighting that makes your whole kitchen feel brighter.

    In 2024, smart recessed lights are all the rage. You can control them with your phone or voice commands. Imagine walking into your kitchen and saying, “Hey, lights on!” It’s like living in the future, right in your own home!

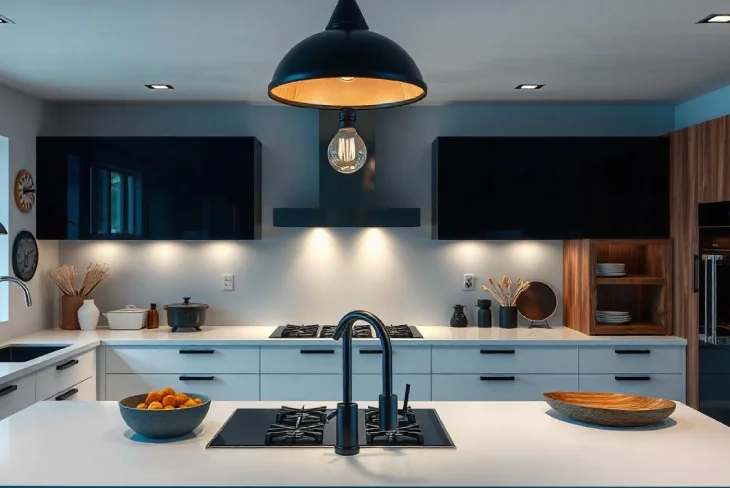
    4. Statement Chandelier

    A statement chandelier in the kitchen? You bet! It’s like putting a fancy hat in your room. A big, bold chandelier can turn your kitchen from “meh” to “wow” in no time. It’s not just a light; it’s a piece of art that happens to brighten up your space.

    Chandeliers come in all shapes and sizes. You might go for a classic crystal one that sparkles like diamonds. Or maybe a modern, geometric design that looks like it belongs in an art gallery. The key is to pick one that fits your kitchen’s personality.

    Hanging a chandelier over a dining area or a kitchen island can create a stunning focal point. It’s like saying, “Hey, look over here!” to anyone who walks in. Just make sure it’s not so big that it gets in the way when you’re trying to cook or eat.

    5. Track Lighting Systems

    Track lighting systems are like the Swiss Army knives of kitchen lighting. They’re super flexible and can do a little bit of everything. Imagine a metal track attached to your ceiling with lights that you can move around. Cool, right?

    With track lighting, you can point lights wherever you need them. Do you have a dark corner where you keep your cookbooks? Zap! Light it up. Want to highlight your fancy new backsplash? No problem! Just adjust the lights to show it off.

    In 2024, track lighting has gotten even cooler. Some systems let you control each light individually with your smartphone. So, you can create different lighting scenes for cooking, cleaning, or just hanging out. It’s like having a lighting designer in your pocket!

    6. Minimalist Globe Pendants

    Minimalist globe pendants are like bubbles of light floating in your kitchen. They’re simple, clean, and oh-so-stylish. These round lights can add a touch of modern elegance to any kitchen, big or small.

    Globe pendants come in different sizes. You can mix and match them to create an interesting look. Hang a cluster of small globes in one corner, or go for a few larger ones spread out over your island. The soft, diffused light they give off is perfect for creating a cozy atmosphere.

    One of the best things about these pendants is how versatile they are. They can fit in with almost any kitchen style. Whether your kitchen is super modern or more traditional, globe pendants can work their magic. It’s like they’re the chameleons of the lighting world!

    7. Industrial-Style Fixtures

    Industrial-style fixtures are like bringing a bit of an old factory into your kitchen – but in a good way! These lights often have a raw, unfinished look that’s become super popular. Think exposed bulbs, metal shades, and maybe even some visible wires or pipes.

    These fixtures can add a cool, edgy vibe to your kitchen. They work great in modern spaces, but they can also add an interesting contrast in more traditional kitchens. It’s like mixing old and new in one awesome package.

    In 2024, we’re seeing a lot of industrial fixtures made with sustainable materials. Recycled metal, eco-friendly finishes – it’s all about looking good while being kind to the planet. So, you can light up your kitchen and feel good about it too!

    8. Smart Lighting Solutions

    Smart lighting solutions are like having a tiny lighting expert living in your kitchen. These high-tech lights can do all sorts of cool tricks. You can control them with your phone, set them on schedule, or even change their colors!

    Imagine walking into your kitchen in the morning, and the lights slowly brightening to help you wake up. Or setting the mood for a dinner party with just a tap on your phone. Smart lights can do all that and more. Some can even sync with your music or TV for a full sensory experience.

    One of the best things about smart lighting is how energy-efficient it is. Many systems can learn your habits and adjust themselves to save power. It’s like having a light that thinks about your energy bill! In 2024, more and more kitchens are going smart, and it’s easy to see why.

    9. Layered Lighting Approach

    A layered lighting approach is like creating a lighting sandwich for your kitchen. It’s all about combining different types of lights to cover all your bases. You’ve got your main light (that’s like the bread), then you add task lighting (the meat) and finish with accent lighting (the tasty toppings).

    The idea is to have light coming from different directions and heights. This helps eliminate shadows and makes your kitchen more functional and beautiful. For example, you might have recessed lights in the ceiling, under-cabinet lights for tasks, and some pretty pendant lights for style.

    In 2024, designers are getting creative with layered lighting. They’re mixing and matching different styles and types of lights to create unique looks. It’s like being the DJ of your kitchen – you’re mixing different tracks to create the perfect lighting playlist!

    10. Accent Lighting for Shelves

    Accent lighting for shelves is like putting a spotlight on your favorite kitchen stars. It’s a great way to show off your cool dishes, fancy glasses, or that quirky salt and pepper shaker set you love. These lights can turn ordinary shelves into eye-catching displays.

    You can use small LED strips or puck lights to illuminate your shelves. They’re usually hidden behind the front of the shelf, so all you see is the magical glow. It’s like your dishes are on stage, ready to perform!

    In 2024, we’re seeing a lot of color-changing accent lights. You can switch up the mood of your kitchen just by changing the color of your shelf lighting. Feeling blue? Make your shelves glow blue! Want a warm, cozy vibe? Switch to a soft amber. It’s like having a mood ring for your kitchen!

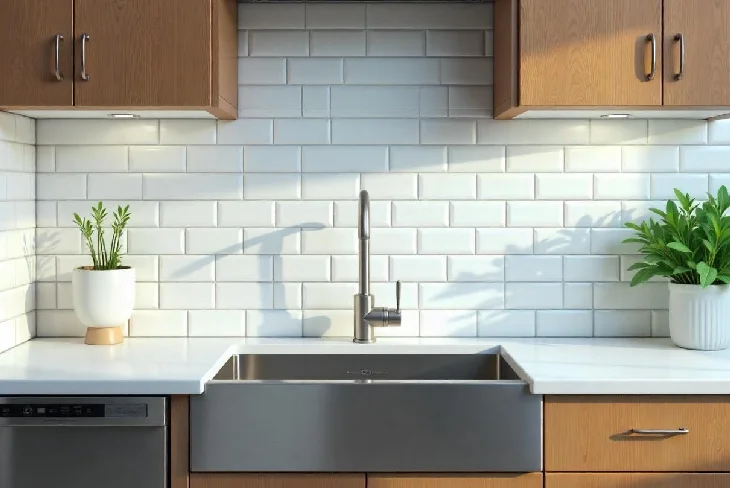
    11. Task Lighting for Workspaces

    Task lighting for workspaces is like giving your kitchen a pair of reading glasses. It’s all about providing bright, focused light exactly where you need it. This kind of lighting is super important for areas where you do a lot of work, like chopping veggies or reading recipes.

    Under-cabinet lights are great for illuminating countertops. But don’t forget about other work areas! A well-placed pendant light over the sink can make doing dishes (slightly) more enjoyable. And a bright light near the stove can help you keep an eye on your cooking.

    In 2024, adjustable task lights are becoming more popular. These lights let you direct the beam exactly where you need it. It’s like having a personal spotlight that follows your kitchen tasks. No more squinting at ingredient labels or wondering if that chicken is cooked through!

    12. Dimmable Fixtures

    Dimmable fixtures are like having a volume control for your lights. They let you adjust the brightness to fit your mood or the time of day. Bright light for cooking, soft light for dining – it’s all possible with dimmable fixtures.

    Almost any type of light can be made dimmable these days. Recessed lights, pendants, and even some LED strips can all be fitted with dimmer switches. It’s a great way to make your kitchen lighting more flexible and energy-efficient.

    In 2024, smart dimmable fixtures are all the rage. You can control them with your voice or your phone, and some even adjust automatically based on the time of day or the amount of natural light in the room. It’s like your lights are reading your mind!

    13. Oversized Decorative Pendants

    Oversized decorative pendants are like the supermodels of kitchen lighting. They’re big, they’re bold, and they’re not afraid to show off! These lights are meant to be seen and admired. They can become the centerpiece of your kitchen, drawing everyone’s eye as soon as they walk in.

    You can find oversized pendants in all sorts of styles. There are sleek, modern ones that look like they’re from a sci-fi movie. Or you might prefer a big, rustic pendant that looks like it came from an old farmhouse. The key is to choose one that fits your kitchen’s personality.

    In 2024, we’re seeing a lot of oversized pendants made from unexpected materials. Think woven rattan, recycled glass, or even paper! It’s like wearing a statement necklace but for your kitchen. Just remember, with big pendants, one or two is usually enough – you don’t want your kitchen to look like a lighting store!

    14. Backlit Backsplash

    A backlit backsplash is like giving your kitchen walls a secret superpower. It’s a clever way to add soft, ambient light to your kitchen while also making your backsplash look amazing. Imagine your tile or glass backsplash glowing from behind – pretty cool, right?

    To create this effect, LED strips are installed behind a translucent backsplash material. The light shines through, creating a warm, inviting glow. It’s great for setting a mood in the evening or providing a gentle nightlight.

    In 2024, color-changing backlit backsplashes are becoming more popular. You can switch up the color to match your mood or the occasion. Have a party? Make your backsplash glow blue or purple. Want a cozy night in? Switch to a warm amber. It’s like having a chameleon for a backsplash!

    15. Vintage-Inspired Sconces

    Vintage-inspired sconces are like little time machines for your kitchen walls. They bring a touch of old-world charm to your cooking space. These wall-mounted lights can add character and warmth to any kitchen, whether it’s modern or traditional.

    Sconces are great for adding light at eye level, which can help create a cozy atmosphere. You might put them on either side of a window, next to your range hood, or in a dining nook. They’re like the earrings of your kitchen – small but impactful!

    In 2024, we’re seeing a lot of vintage-inspired sconces with modern twists. Think old-fashioned shapes with new materials, or antique-style fixtures with LED bulbs. It’s like mixing your grandma’s recipe with some new spices – familiar, but with a fresh kick!

    Conclusion

    Lighting up your kitchen is like painting with light. It’s a chance to get creative and make your space truly shine. From practical task lighting to show-stopping decorative fixtures, there’s a world of possibilities out there. Remember, good lighting isn’t just about seeing better – it’s about creating a mood, highlighting your kitchen’s best features, and making the heart of your home feel warm and welcoming.

    As we’ve seen, 2024 is all about smart, flexible, and energy-efficient lighting solutions. But it’s also about expressing your style. Whether you prefer sleek and modern or cozy and traditional, there’s a lighting idea out there for you. So go ahead, and mix and match these ideas to create your perfect kitchen lighting recipe.

    Your dream kitchen is just a flick of the switch away!

  • Pros and Cons of Installing a Kitchen Peninsula

    Pros and Cons of Installing a Kitchen Peninsula

    Are you thinking about giving your kitchen a makeover? Well, you’re not alone! Kitchens are the heart of many homes, and people are always looking for ways to make them more functional and stylish. One popular option that’s been gaining traction is the kitchen peninsula. But what exactly is a kitchen peninsula, and is it the right choice for your home?

    Let’s dive into the pros and cons of installing a kitchen peninsula and help you make an informed decision.

    What’s a Kitchen Peninsula Anyway?

    Before we jump into the nitty-gritty, let’s clear up what we’re talking about. A kitchen peninsula is like a kitchen island’s cousin. It’s an extended countertop that juts out from a wall or existing cabinetry, creating an L-shaped or U-shaped layout. Unlike an island, which stands alone in the middle of the kitchen, a peninsula is connected on one end, making it a versatile addition to many kitchen designs.

    Think of a peninsula as a bridge between your kitchen and the rest of your living space. It’s not just a countertop; it’s a multifunctional area that can transform how you use your kitchen. Whether you’re whipping up a quick breakfast or hosting a dinner party, a peninsula can be the star of the show or a supporting player in your kitchen’s performance.

    Now, let’s roll up our sleeves and explore the good, the bad, and the beautiful of kitchen peninsulas.

    Pros of a Kitchen Peninsula

    1. Space Optimization Wizardry

    One of the biggest perks of a kitchen peninsula is its space-saving superpowers. For smaller kitchens, a peninsula can be a game-changer. It provides extra counter space without hogging up the entire floor area like an island might. This is especially handy if you’re working with a cozy kitchen where every inch counts.

    But it’s not just about saving space. A peninsula can make your kitchen feel bigger. How? By creating an open feel while still defining different areas of your kitchen. It’s like having an invisible wall that doesn’t close off the space. Pretty neat, right?

    2. Storage Bonanza

    Who doesn’t love extra storage? A kitchen peninsula is like a treasure chest for all your kitchen gadgets and gizmos. You can add cabinets, drawers, or even open shelving underneath. This means more room for your pots, pans, and that fancy blender you got last Christmas but never use.

    And here’s a pro tip: Use the end of your peninsula for a bookshelf to store your cookbooks. It’s practical and adds a pop of color to your kitchen. Win-win!

    3. Multitasking Marvel

    Peninsulas are the Swiss Army knives of kitchen design. They can serve multiple purposes:

    • Prep station for chopping veggies
    • Casual dining area with bar stools
    • Homework spot for the kids
    • Buffet setup for parties
    • Coffee bar for your morning brew

    The versatility of a peninsula means it can adapt to your lifestyle. Whether you’re a master chef or a microwave maestro, a peninsula can be tailored to fit your needs.

    4. Budget-Friendly Beauty

    If you’re watching your wallet, a peninsula might be your new best friend. Compared to installing a kitchen island, a peninsula is often more budget-friendly. Why? Because it’s an extension of your existing cabinetry and countertops, you’re not starting from scratch.

    Plus, you don’t need to worry about additional flooring or electrical work that might come with an island. It’s like getting a kitchen upgrade without breaking the bank!

    5. Traffic Flow Enhancer

    Ever felt like your kitchen was a maze during dinner prep? A peninsula can help with that. By creating a natural flow in your kitchen, it can improve traffic patterns. This means fewer collisions with your cooking partners and a smoother cooking experience overall.

    It’s like having a traffic conductor in your kitchen, guiding everyone where they need to go without bumping into each other. Sounds peaceful, doesn’t it?

    Cons of a Kitchen Peninsula

    1. Space Constraints

    While a peninsula can be a space-saver, it’s not always the best fit for every kitchen. In very small kitchens, a peninsula might actually make the space feel cramped. It’s like trying to fit a grand piano in a tiny apartment – sometimes it just doesn’t work.

    Before you jump on the peninsula bandwagon, make sure you have enough room to move around comfortably. You don’t want to feel like you’re navigating an obstacle course every time you cook dinner.

    2. Limited Access

    Unlike an island that you can walk around, a peninsula is only accessible from three sides. This can sometimes create a dead end in your kitchen layout. It’s like having a cul-de-sac in your kitchen – great for some, but not for everyone.

    If you’re someone who loves to have multiple people working in the kitchen at once, this limited access might cramp your style. It’s something to consider if you’re a fan of collaborative cooking.

    3. Design Inflexibility

    Once you install a peninsula, it’s there to stay – at least without some major renovations. This lack of flexibility can be a downside if you like to switch up your kitchen layout frequently. It’s like getting a tattoo; you better be sure you love it because it’s not easy to change.

    If you’re someone who enjoys rearranging furniture or likes to keep their options open, a peninsula might feel a bit too permanent for your taste.

    4. Potential for Clutter

    A peninsula can quickly become a catch-all for clutter. Mail, keys, school papers – they all seem to gravitate towards that extra counter space. Before you know it, your beautiful peninsula might look more like a messy desk.

    To avoid this, you’ll need to be diligent about keeping it tidy. Think of it as adopting a new pet – it requires regular maintenance to keep it looking its best.

    5. Lighting Challenges

    Depending on your kitchen’s layout, a peninsula might create some dark corners or shadows. This can make it tricky to get good lighting for food prep or reading recipes. It’s like trying to read a book in a dimly lit room – not impossible, but not ideal either.

    You might need to invest in some additional lighting solutions to brighten up these areas, which could add to your overall costs.

    Is a Peninsula Right for You?

    Now that we’ve explored the ups and downs of kitchen peninsulas, how do you decide if it’s the right choice for your home? Here are some questions to ask yourself:

    1. How big is your kitchen?
    2. What’s your cooking style?
    3. Do you entertain often?
    4. Are you looking for extra storage?
    5. What’s your budget?

    Let’s break it down with a handy comparison table:

    Factor Peninsula Island
    Space Required Less More
    Accessibility 3 sides 4 sides
    Cost Generally lower Often higher
    Flexibility Fixed Can be movable
    Storage Good Excellent
    Seating Limited More options

    Remember, there’s no one-size-fits-all solution. What works for your neighbor might not work for you. It’s all about finding the right fit for your space and lifestyle.

    Tips for a Perfect Peninsula

    If you’ve decided a peninsula is the way to go, here are some tips to make the most of it:

    1. Consider the overhang: Make sure there’s enough overhang for comfortable seating if you plan to use bar stools.
    2. Think about outlets: Include electrical outlets for small appliances or charging devices.
    3. Play with materials: Mix and match countertop materials for visual interest.
    4. Light it up: Install pendant lights or under-cabinet lighting to brighten the space.
    5. Get creative with storage: Use pull-out organizers, lazy Susans, or specialized drawers to maximize storage.

    The Bottom Line

    Installing a kitchen peninsula can be a fantastic way to upgrade your kitchen. It offers extra counter space, and storage, and can create a more open feel in your home. However, it’s not without its challenges. You’ll need to consider your space carefully and be prepared for a permanent addition to your kitchen layout.

    Ultimately, the decision comes down to your specific needs, preferences, and kitchen layout. A peninsula can be a bridge between functionality and style, creating a space that’s both practical and inviting. Whether you’re a culinary enthusiast or just someone who enjoys a good cup of coffee in the morning, a well-designed peninsula can enhance your kitchen experience.

    So, are you ready to take the plunge and add a peninsula to your kitchen? Or are you still on the fence? Whatever you decide, remember that the best kitchen is one that works for you and your family.

    Happy renovating!

  • How to Avoid Common Kitchen Remodeling Mistakes

    How to Avoid Common Kitchen Remodeling Mistakes

    Are you dreaming of a brand-new kitchen but worried about making costly errors? You’re not alone. Kitchen remodeling can be an exciting yet daunting task, filled with endless choices and potential pitfalls. But don’t worry! We’ve got you covered with this comprehensive guide on how to avoid common kitchen remodeling mistakes. Whether you’re planning a minor update or a major overhaul, these tips will help you navigate the renovation process like a pro, ensuring your dream kitchen becomes a reality without breaking the bank or your sanity.

    Importance of Proper Planning

    Before you even think about picking out new cabinets or appliances, it’s crucial to have a solid plan in place. Many homeowners make the mistake of diving into their kitchen remodel without proper preparation, leading to costly errors and frustrating delays.

    First things first, set a realistic budget. On average, homeowners in the U.S. spend between $12,000 and $35,000 for a mid-range kitchen renovation[3]. However, costs can vary widely depending on your location and the scope of your project. In San Francisco, for example, you might be looking at $40,000 to $72,000, while in Los Angeles, the range is typically $24,000 to $43,000[6].

    But here’s a pro tip: don’t just plan for your ideal budget. Set aside an extra 10-20% for unexpected expenses. Trust us, you’ll thank yourself later when you discover that hidden plumbing issue or fall in love with slightly pricier countertops.

    Next, think about your kitchen’s layout. While it’s tempting to completely overhaul your space, sometimes working with what you have can be more cost-effective. 70% of homeowners don’t change the size of their kitchen during renovation[3]. If you can achieve your goals without moving walls or plumbing, you’ll save a significant amount of money and time.

    Choosing the Right Style and Materials

    Now comes the fun part – picking out your kitchen’s new look! But beware, this is where many homeowners stumble. It’s easy to get carried away with trendy designs that might look dated in a few years.

    Instead, aim for a timeless style that will stand the test of time. Transitional style remains the most popular choice, selected by 26% of homeowners[4]. This blend of traditional and contemporary elements offers a versatile look that can easily be updated with small changes over time.

    When it comes to materials, durability is key. Your kitchen sees a lot of action, so choose surfaces that can withstand daily wear and tear. Quartz countertops, for instance, have become increasingly popular due to their durability and low maintenance requirements.

    And don’t forget about color! While it’s tempting to go bold, too much color can make your kitchen feel overwhelming. Instead, stick to a cohesive color scheme with neutral tones for larger surfaces like cabinets and countertops. Then, add pops of color through smaller accents like backsplash tiles or accessories[1].

    The Devil’s in the Details: Common Oversights

    It’s often the little things that can make or break a kitchen remodel. Here are some details that homeowners frequently overlook:

    1. Inadequate lighting: Don’t underestimate the power of good lighting. A well-lit kitchen not only looks better but is also safer and more functional.
    2. Insufficient storage: In the excitement of choosing pretty finishes, it’s easy to forget about practical storage solutions. Plan for enough cabinet space and consider smart storage options like pull-out pantries or corner drawers.
    3. Poor ventilation: A powerful range hood is essential for removing cooking odors and preventing grease buildup.
    4. Neglecting the workflow: Remember the kitchen work triangle (sink, stove, and refrigerator). These key areas should be arranged efficiently to make cooking and cleaning easier.
    5. Forgetting about outlets: In our tech-driven world, you’ll need plenty of electrical outlets for appliances and charging devices.

    The Renovation Process!

    Now that you’ve got your plan in place, let’s talk about the actual renovation process. On average, a kitchen remodel can take anywhere from 6 to 12 weeks, depending on the scope of work[5]. Here’s a general timeline to help you prepare:

    1. Design and planning: 2-3 weeks
    2. Demolition: 1-2 weeks
    3. Structural work (if needed): 1-2 weeks
    4. Plumbing and electrical: 1-2 weeks
    5. Drywall and painting: 1-2 weeks
    6. Cabinets and countertops: 1-2 weeks
    7. Flooring: 1 week
    8. Backsplash and finishing touches: 1-2 weeks

    Remember, these are just estimates. Unexpected issues can arise, so it’s always best to add a buffer to your timeline.

    Hiring the Right Professionals

    Unless you’re a DIY expert, you’ll likely need to hire professionals for your kitchen remodel. This is another area where many homeowners make mistakes, either by trying to do too much themselves or by hiring the wrong people.

    According to recent statistics, 89% of homeowners hire a pro for their renovation project[3]. The most popular professional hired is a general contractor (53%), followed by a cabinet maker (31%)[3].

    When choosing professionals, don’t just go for the lowest bid. Look for experienced contractors with good references and proper licensing and insurance. And always get everything in writing, including a detailed contract and payment schedule.

    Budgeting Wisely

    One of the biggest challenges in a kitchen remodel is deciding where to allocate your budget. While it’s tempting to splurge on everything, that’s rarely feasible. Here’s a general breakdown of where your budget might go:

    • Cabinets: 30-35%
    • Appliances: 20-25%
    • Countertops: 10-15%
    • Labor: 15-20%
    • Flooring: 5-7%
    • Lighting and electrical: 5-7%
    • Plumbing: 3-5%
    • Miscellaneous: 3-5%

    Remember, these percentages can vary based on your specific needs and preferences. For instance, if you’re an avid cook, you might want to allocate more of your budget to high-end appliances.

    Don’t Forget About Functionality

    In the pursuit of a beautiful kitchen, it’s easy to overlook functionality. But a kitchen that looks great but doesn’t work well is a recipe for frustration. Here are some functional aspects to consider:

    • Work zones: Plan dedicated areas for food prep, cooking, and cleaning.
    • Island functionality: If you’re including an island, think about how you’ll use it. Will it need electrical outlets? A sink? Seating?
    • Appliance placement: Ensure your refrigerator door doesn’t block traffic flow when open, and that there’s enough counter space next to the stove and sink.
    • Trash and recycling: Plan a convenient spot for bins, ideally near the sink or food prep area.

    Avoiding Trend Traps

    While it’s fun to incorporate current trends, be cautious about going overboard. Some trends can quickly look dated, and you don’t want to invest in a major renovation only to feel like your kitchen is out of style in a few years.

    Instead, consider incorporating trends in easily changeable elements like paint colors, light fixtures, or hardware. This way, you can update your kitchen’s look without another major renovation.

    The Importance of Quality Materials

    It might be tempting to cut costs by choosing cheaper materials, but this can often lead to regret down the line. Quality materials not only look better but also tend to last longer, saving you money in the long run.

    This doesn’t mean you need to choose the most expensive option for everything. But for high-use items like faucets, sinks, and cabinet hardware, investing in quality can make a big difference in both appearance and functionality.

    Don’t Forget About Resale Value

    While your primary goal is likely to create a kitchen you love, it’s wise to keep potential resale value in mind. Kitchens are one of the most important rooms to potential buyers, and a well-designed kitchen can significantly increase your home’s value.

    According to recent statistics, homeowners can expect to recoup about 70-80% of their kitchen remodel costs when they sell their home[3]. To maximize your return on investment, focus on improvements that have broad appeal, like energy-efficient appliances, durable countertops, and ample storage.

    Final Touches

    As your renovation nears completion, don’t overlook the finishing touches. These small details can make a big impact on the overall look and feel of your kitchen:

    • Hardware: Choose cabinet knobs and pulls that complement your overall style.
    • Backsplash: This is a great place to add personality and color to your kitchen.
    • Lighting: Consider a mix of task lighting (under-cabinet lights), ambient lighting (recessed lights), and decorative lighting (pendant lights over an island).
    • Window treatments: These can add softness and style to your kitchen while also providing privacy.

    Conclusion

    Renovating your kitchen can be a challenging but rewarding process. By avoiding common mistakes and planning carefully, you can create a beautiful, functional space that you’ll love for years to come. Remember, the key to a successful kitchen remodel is thorough planning, realistic budgeting, and attention to both style and functionality.

    Happy remodeling!

  • Best Ventilation Options for Your Kitchen Remodel

    Best Ventilation Options for Your Kitchen Remodel

    Are you dreaming of a kitchen makeover? Well, don’t forget to breathe easy! Ventilation options for your kitchen remodel might not be the first thing on your mind, but they’re as crucial as that shiny new countertop.

    Let’s dive into the world of kitchen airflow and discover how the right ventilation can transform your cooking space from a stuffy sauna to a fresh culinary oasis.

    Why Kitchen Ventilation Matters

    Imagine you’re whipping up a storm in your kitchen. The sizzle of bacon, the steam from boiling pasta, and the aroma of garlic filling the air. Sounds great, right? But without proper ventilation, all that cooking goodness can quickly turn your kitchen into a hot, greasy, and smelly mess.

    Good kitchen ventilation does more than just clear the air. It’s your secret weapon against a host of kitchen woes. First off, it kicks those pesky cooking odors to the curb. No more lingering smells of last night’s fish fry when you’re trying to enjoy your morning coffee!

    But there’s more. Proper ventilation is like a superhero for your kitchen’s health. It swoops in to rescue you from excess moisture, which can lead to mold and mildew. Nobody wants fuzzy green stuff growing on their walls, right? Plus, it helps keep your kitchen cooler, so you’re not sweating buckets every time you turn on the stove.

    Here’s a shocker: studies have found that using an exhaust fan in your kitchen may slash your risk of lung cancer by up to 50%. That’s right, your humble kitchen fan could be a lifesaver!

    Types of Kitchen Ventilation Systems

    Now that we know why ventilation is so important, let’s check out your options. There’s no one-size-fits-all solution here. The best ventilation system for your kitchen depends on your space, your cooking habits, and your budget.

    1. Range Hoods

    Range hoods are like the classic rock of kitchen ventilation – they never go out of style. These bad boys come in all shapes and sizes, from sleek wall-mounted models to island versions for your fancy kitchen island.

    Wall-mounted range hoods are perfect for kitchens with stoves against the wall. They’re efficient and can be a real style statement. Some look like mini-chimneys, while others are so sleek you might mistake them for modern art!

    Do you have a kitchen island with a cooktop? An island range hood is your go-to. These hang from the ceiling right over your island, capturing cooking fumes before they can escape into the rest of your home.

    If you’re short on space, under-cabinet range hoods are your best bet. They tuck neatly under your cabinets, saving precious kitchen real estate while still doing a bang-up job of clearing the air.

    2. Downdraft Ventilation

    If you’re all about that open-concept life, downdraft ventilation might be your jam. These systems are like ninjas – they pop up when you need them and disappear when you don’t. They’re installed right next to or behind your cooktop, pulling smoke and steam down and out instead of up.

    Downdraft ventilation is a rockstar for kitchens that can’t spare upper cabinet space. They’re perfect for islands or open-plan kitchens where you don’t want a big hood blocking your view. Plus, they’re great conversation starters – your guests will be amazed when they see your cooktop magically clear itself of smoke!

    3. Ceiling and Wall-Mounted Systems

    Want to get fancy? Ceiling-mounted ventilation systems are like having a whole ceiling dedicated to keeping your air clean. They’re not just for fancy restaurants anymore – more and more home chefs are discovering the joys of a ventilated ceiling.

    These systems work by extracting air evenly across the entire cooking area. They’re super efficient and can handle even the most intense cooking sessions. Plus, they look pretty darn cool.

    If you’re not ready to commit to a full ceiling system, wall-mounted fans can be a great alternative. They’re less obtrusive than a full-range hood but still pack a punch when it comes to clearing the air.

    Choosing the Right Ventilation System

    So, how do you pick the perfect ventilation system for your kitchen remodel? It’s not just about looks (though that’s important too!). You need to consider a few key factors.

    1. Size Matters

    First up, think about the size of your kitchen and your cooktop. A tiny hood over a massive professional-grade range is like bringing a knife to a gunfight – it’s just not going to cut it.

    Here’s a handy rule of thumb: your ventilation system should be at least as wide as your cooktop, and ideally a bit wider. For example, if you’ve got a 30-inch stove, aim for a 36-inch vent hood.

    2. Power Up

    Next, let’s talk power. In the world of kitchen ventilation, power is measured in CFM (cubic feet per minute). The higher the CFM, the more air your system can move.

    But how much CFM do you need? A good starting point is 100 CFM for every 10 inches of stove width. So, a 30-inch stove would need at least 300 CFM. But if you’re a serious cook or you’ve got a gas range, you might want to bump that up a bit.

    3. Your Cooking Style

    Are you a casual cook who mostly heats leftovers, or are you the next Gordon Ramsay? Your cooking habits play a big role in choosing the right ventilation.

    If you’re all about stir-frying, grilling, and other high-heat, smoky cooking methods, you’ll want a more powerful system. On the other hand, if your idea of cooking is making a mean bowl of cereal, you might be able to get away with a less intense setup.

    4. Noise Considerations

    Let’s face it, nobody wants their kitchen to sound like a jet engine. When choosing your ventilation system, pay attention to the noise level, measured in sones.

    The lower the sone rating, the quieter the fan. A rating of 1 sone is about as loud as your refrigerator humming. If peace is important to you, look for systems with multiple speed settings so you can crank it up when you need to and keep it low the rest of the time.

    Ducted vs. Ductless Ventilation

    Now, let’s get into the nitty-gritty: ducted versus ductless ventilation. This is a big decision in your kitchen remodel, and it can affect both the performance of your system and the layout of your kitchen.

    1. Ducted Systems: The Power Players

    Ducted ventilation systems are like the express train of kitchen air – they take cooking fumes and whisk them straight outside. These systems connect to ductwork that leads out of your house, usually through the roof or an exterior wall.

    The big pro of ducted systems is their efficiency. They’re great at removing smoke, steam, and odors from your kitchen. Plus, they can handle higher CFM ratings, making them ideal for serious cooks or larger kitchens.

    But ducted systems have their downsides too. They’re usually more expensive to install, especially if you don’t already have ductwork in place. They also take up more space, which can be a deal-breaker in smaller kitchens.

    2. Ductless Systems: The Flexible Friends

    On the other hand, ductless (or recirculating) systems are like air purifiers for your kitchen. They suck in the air, filter out the bad stuff, and then pump the cleaned air back into your kitchen.

    The big advantage of ductless systems is their flexibility. You can install them pretty much anywhere, without worrying about ductwork. They’re usually cheaper to install and can be a great option for renters or homes where installing ducts isn’t possible.

    The downside? They’re not as effective at removing heat and moisture from your kitchen. And while they do a decent job with odors, they’re not as thorough as ducted systems.

    Installation Considerations

    Alright, you’ve picked your perfect ventilation system. Now comes the fun part – installing it! (And by fun, we mean potentially complicated and maybe a bit stressful. But don’t worry, we’ve got you covered!)

    1. Proper Placement is Key

    Where you put your ventilation system can make or break its effectiveness. For range hoods, the general rule is to install them 24 to 30 inches above your cooktop. This gives you enough room to cook comfortably while still capturing all those cooking fumes.

    For downdraft systems, placement is even more crucial. They need to be as close to the cooking surface as possible to catch fumes before they rise.

    2. Ductwork: The Hidden Hero

    If you’re going with a ducted system, ductwork is your new best friend. The straighter and shorter the duct run, the better your system will work. Each bend in the ductwork reduces the efficiency of your fan, so try to keep things as direct as possible.

    Also, bigger is better when it comes to duct size. Larger ducts allow air to flow more freely, which means your fan doesn’t have to work as hard. A 6-inch duct is usually the minimum for most home kitchens, but 8 inches is even better if you can swing it.

    Maintenance and Cleaning

    Congratulations! You’ve installed your shiny new ventilation system. But don’t think you can just set it and forget it. Like any hardworking kitchen appliance, your ventilation system needs a little TLC to keep it running smoothly.

    1. Regular Filter Changes

    The filters in your ventilation system are like the lungs of your kitchen. They trap grease, dust, and other nasties, keeping them out of the air you breathe. But over time, these filters can get clogged up, making your system less effective.

    For most home kitchens, you should aim to clean or replace your filters every 1-3 months, depending on how much you cook. If you can see or feel grease building up on the filter, it’s time for a change!

    2. Deep Cleaning

    Every so often, your ventilation system will need a deeper clean. This usually involves taking apart the hood or fan and giving everything a good scrub. It’s not the most fun job in the world, but it’s crucial for keeping your system running efficiently and preventing fire hazards.

    If the thought of dismantling your ventilation system makes you break out in a cold sweat, don’t worry. Many professional cleaning services can handle this for you.

    Energy Efficiency in Kitchen Ventilation

    In today’s world, we’re all trying to be a little greener. The good news is, your kitchen ventilation can help with that!

    When shopping for your ventilation system, look for the Energy Star label. These systems are certified to be more energy-efficient, which is good for both the environment and your electricity bill.

    For the ultimate in energy efficiency, consider a heat recovery ventilation (HRV) system. These clever systems use the heat from the air being exhausted to warm up the fresh air coming in. It’s like recycling the heat from your kitchen!

    Smart Ventilation Solutions

    Welcome to the future of kitchen ventilation! Smart ventilation systems are here, and they’re pretty darn cool.

    These high-tech systems can do all sorts of nifty tricks. Some can automatically adjust their speed based on how much heat or smoke they detect. Others can be controlled from your smartphone, so you can turn on the fan before you even enter the kitchen.

    Some smart systems even integrate with your other smart home devices. Imagine your ventilation system automatically turning on when your smart stove detects that you’re cooking. Now that’s some Jetsons-level stuff!

    Noise Reduction Techniques

    Nobody wants their peaceful cooking session interrupted by a fan that sounds like a helicopter taking off. Luckily, there are ways to keep your kitchen ventilation quiet.

    1. Multiple Speed Settings: Look for systems with multiple speed settings. This allows you to use lower, quieter settings for everyday cooking and crank it up only when you need to.
    2. Insulated Ductwork: If you’re going with a ducted system, insulated ductwork can help muffle the sound of air rushing through the pipes.
    3. Remote Motor Placement: For the ultimate in quiet operation, consider a system with a remote motor. These setups place the motor (the noisiest part) away from the kitchen, often in the attic or outside.

    Aesthetic Considerations

    Your ventilation system doesn’t have to be an eyesore. It can be a real statement piece in your kitchen!

    From sleek stainless steel to rustic copper, there’s a range of hoods out there to match any kitchen style. Some even come with customizable panels so you can match them perfectly to your cabinets.

    Many range hoods come with built-in lighting, which can be a great way to add some extra illumination to your cooking area. Some even have fancy features like dimmable lights or different color temperatures.

    Ventilation for Outdoor Kitchens

    Taking your cooking outside? Don’t forget about ventilation! Outdoor kitchens need good airflow too, especially if they’re in a covered area.

    For outdoor spaces, you might want to consider a more powerful system to deal with wind and other outdoor factors. And make sure to choose a system that’s rated for outdoor use – it needs to stand up to the elements!

    Compliance with Building Codes

    Before you get too excited about your new ventilation system, make sure to check your local building codes. These regulations ensure that your kitchen ventilation is safe and effective.

    Most codes will specify things like minimum airflow rates, duct sizes, and where your system can vent to. It’s a good idea to consult with a professional or your local building department to make sure your plans are up to code.

    Cost Considerations

    Let’s talk money. The cost of your ventilation system can vary widely depending on the type, size, and features you choose.

    A basic range hood might set you back a few hundred dollars, while a high-end, custom-built system could cost several thousand. Don’t forget to factor in installation costs, especially if you need to add or modify ductwork.

    Remember, though, that good ventilation is an investment in your home and your health. It can help prevent damage to your kitchen from moisture and grease, and it can make your home a more pleasant (and healthier) place to live.

    Wrapping It Up

    Whew! We’ve covered a lot of ground, from the basics of why ventilation matters to the nitty-gritty of different systems and installation considerations. Remember, the perfect ventilation system for your kitchen remodel is out there – it’s just a matter of finding the right balance of effectiveness, efficiency, and style for your needs.

    So, as you’re planning your kitchen remodel, don’t let ventilation be an afterthought. Give it the attention it deserves, and you’ll be rewarded with a kitchen that’s not just beautiful, but also comfortable, healthy, and a joy to cook in.

    Happy remodeling, and here’s to many years of delicious meals in your well-ventilated kitchen!

  • Ivar Salmon House: A Seattle Landmark with a Rich History

    Ivar Salmon House: A Seattle Landmark with a Rich History

    Ivar Salmon House is a beloved Seattle institution that’s been serving up delicious seafood and stunning views for over 50 years. This unique restaurant, shaped like a Northwest Native American longhouse, sits on the shores of Lake Union, offering diners a taste of Pacific Northwest cuisine and culture.

    The Man Behind the Restaurant: Ivar Haglund

    Ivar Haglund, the founder of Ivar’s Seafood Restaurants, was quite a character. Born in Seattle in 1905, he became a local legend known for his quirky humor, business savvy, and love for the Pacific Northwest. Haglund started his career in the food industry with a small fish and chips stand on the Seattle waterfront in 1938. This humble beginning grew into a chain of restaurants that’s now synonymous with Seattle seafood.

    Haglund wasn’t just a restaurateur. He was also a folk singer, radio personality, and real estate mogul. He owned several properties in Seattle, including the iconic Smith Tower, which he famously adorned with a giant fish wind sock (much to the chagrin of city officials).

    Ivar Salmon House

    Ivar’s Salmon House opened its doors in 1969, though its first night was a bit of a smoky disaster. Haglund had used wet alder in the central grill, which caused so much smoke that the restaurant had to be evacuated and closed. It reopened a year later, this time with proper exhaust hoods.

    The restaurant is a beautiful cedar replica of a Northwest Native American Longhouse. It features an open-pit Native American-style barbecue for preparing alder-smoked dishes. The interior is filled with Northwest native art, décor, and historical photographs.

    Ivar Salmon House Menu

    Category Item Price
    Starters Classic Caesar Salad $24
    Cup of Clam Chowder $9
    Artichoke, Crab, & Bay Shrimp Dip $20
    Calamari $20
    Seafood Cocktail $20
    Margarita Prawns $19
    Seared Ahi Tuna $21
    Soups & Salads Ivar’s Clam Chowder (Bowl) $10.50
    Smoked Salmon Chowder (Bowl) $10.50
    Harvest Salad $14
    Kale Salad $12
    Entrees Ivar’s Salmon House Cioppino $44
    Alder Grilled Wild Alaska Coho Salmon $43
    Cedar Plank Wild Alaska Sockeye Salmon $44
    Crab Stuffed Wild Alaska Halibut $46
    Spicy Marinara & Cream Linguine with Salmon $34
    Chicken Saltimbocca $33
    Crab & Shrimp Louie $32
    Spicy Blackened Wild Alaska Sockeye Caesar $32
    Alder Grilled Wild Salmon Duo $46
    Classics Ivar’s World-Famous Fish ‘n Chips (4 piece) $24.50
    Ivar’s World-Famous Fish ‘n Chips (5 piece) $27.50
    Vegetarian Portobello Stack $20
    Curry Vegetable Sauté $22
    Seasonal Berry Salad $14
    Butternut Squash Enchiladas $23
    Desserts Chocolate Decadence Not listed
    Ice Cream Scoop Not listed

    Note: Prices and menu items may vary. This table represents a selection of items from the provided menu and may not include all available options.

    Where Is Ivar Salmon House Located?

    Ivar’s Salmon House is situated at 401 NE Northlake Way, Seattle, WA 98105. It overlooks Lake Union, offering spectacular views of boats cruising by and the Seattle skyline.

    The restaurant’s design is a standout feature. It’s not just a place to eat; it’s an immersive experience that celebrates Pacific Northwest culture. The longhouse design, complete with its open-pit barbecue, creates a unique atmosphere that sets it apart from other seafood restaurants.

    The property spans approximately 58,000 square feet and includes a full-service restaurant, a fish bar, two parking lots, and a dock.

    Ivar’s Salmon House 401 NE Northlake Way Seattle, WA 98105

    Is Ivar Salmon House Listed for Sale?

    As of 2023, Ivar’s Salmon House is not listed for sale. However, in an interesting business move, Ivar sold the property in 2015 for $13.73 million to the Bellevue-based real estate company Fana Group. But don’t worry, seafood lovers! Ivar’s isn’t going anywhere. They signed a 20-year lease with two five-year options, ensuring that the restaurant will continue to operate as usual.

    House Amenities

    Here are some of the amenities you can expect at Ivar’s Salmon House:

    • Open-pit Native American-style barbecue
    • Panoramic views of Lake Union and Seattle skyline
    • Northwest native art and décor
    • Historical photographs
    • Full-service bar (The Whalemaker Lounge)
    • Outdoor Fish Bar for casual dining
    • Boat dock for to-go orders
    • Ample parking

    Neighborhood Area

    Ivar’s Salmon House is located in the Northlake neighborhood of Seattle, right on the shores of Lake Union. This area is known for its maritime atmosphere, with numerous marinas and boat-related businesses nearby. It’s a bustling part of the city, popular with both locals and tourists for its waterfront views and proximity to downtown Seattle.

    Market Value

    While the restaurant itself isn’t for sale, we can look at the property’s value based on its recent sale:

    Detail Information
    Build Year 1969
    Purchase Year (by Fana Group) 2015
    Purchase Value $13.73 million
    Current Estimated Value Not publicly available, likely higher due to Seattle’s real estate market growth
    Property Condition Well-maintained, continues to operate as a popular restaurant

    Ivar’s Real Estate Portfolio

    Ivar’s, as a company, has an interesting real estate strategy. In recent years, they’ve been selling properties they own and leasing them back long-term. This allows them to capitalize on the hot real estate market while ensuring their restaurants can continue to operate in their beloved locations.

    Besides the Salmon House, Ivar’s has sold or plans to sell:

    1. Ivar’s Mukilteo Landing property: Sold in spring 2015 to Seattle-based developer Martin Smith Inc., with a 25-year lease-back arrangement.
    2. Acres of Clams on the Seattle waterfront: As of 2015, a deal was in the works to sell this property with a 30-year lease-back agreement.

    Conclusion

    Ivar’s Salmon House is more than just a restaurant; it’s a Seattle institution that embodies the spirit of the Pacific Northwest. From its unique longhouse design to its stunning lake views and delicious alder-smoked seafood, it offers a truly one-of-a-kind dining experience. While the property may have changed hands, the spirit of Ivar Haglund’s vision continues to live on, delighting locals and tourists alike with great food and unforgettable ambiance.

  • How to Choose the Perfect Kitchen Backsplash

    How to Choose the Perfect Kitchen Backsplash

    Choosing the perfect kitchen backsplash can be a game-changer for your home. It’s not just about protecting your walls from splashes and stains anymore. Today, a backsplash is a key design element that can make or break your kitchen’s look. But with so many options out there, how do you pick the right one? Don’t worry! We’ve got you covered with this ultimate guide to selecting the perfect kitchen backsplash for 2024. From trendy materials to eye-catching patterns, we’ll walk you through everything you need to know to make your kitchen shine.

    So, let’s dive in and discover how to create a backsplash that’s both beautiful and functional!

    Your backsplash is like the jewelry of your kitchen – it can make your space pop and show off your style.

    Choosing the Right Material

    When it comes to picking the perfect kitchen backsplash, the material you choose is super important. It’s not just about looks – you’ve got to think about how well it’ll hold up over time, how easy it is to clean, and if it fits your budget. Let’s break down some of the most popular options:

    Think of your backsplash material as the foundation of your kitchen’s style – it sets the tone for the whole room.

    Popular Backsplash Materials

    1. Ceramic

    Ceramic tiles are a classic choice for a reason. They’re affordable, come in tons of colors and patterns, and are pretty easy to keep clean. Plus, they can handle the heat and moisture in your kitchen like a champ. If you’re looking for a backsplash that won’t break the bank but still looks great, ceramic might be your best bet.

    Ceramic tiles are like the trusty jeans of backsplash materials – reliable, versatile, and always in style.

    2. Glass

    Want to add some sparkle to your kitchen? Glass tiles might be just the thing. They reflect light, making your kitchen feel bigger and brighter. And talk about options – you can find glass tiles in pretty much any color you can imagine. They’re also super easy to wipe down, which is always a plus in a busy kitchen.

    Glass tiles can turn your backsplash into a shimmering work of art, catching the light and adding depth to your kitchen.

    3. Natural Stone

    For a touch of luxury, natural stone like marble or granite can’t be beat. Each piece is unique, so your backsplash will be one-of-a-kind. Keep in mind, though, that stone needs a bit more TLC than other materials. You’ll need to seal it regularly to keep it looking its best.

    Natural stone brings a piece of the earth’s beauty into your kitchen, creating a timeless and elegant look.

    4. Porcelain

    Porcelain tiles are like ceramic’s tougher cousin. They’re super durable and can handle just about anything you throw at them. Spills? No problem. Heat? Bring it on. Plus, they come in a wide range of styles, from sleek and modern to rustic and textured.

    Porcelain tiles are the superheroes of the backsplash world – tough, good-looking, and ready to take on whatever your kitchen dishes out.

    5. Handmade Tiles

    If you’re after something truly special, consider handmade tiles. These artisanal beauties add a unique, personal touch to your kitchen. Each tile is slightly different, creating a warm, organic feel that you just can’t get with machine-made tiles.

    Handmade tiles are like little works of art for your kitchen, each one telling its own story and adding character to your space.

    Design Trends for 2024

    Now that we’ve covered materials, let’s talk about what’s hot in kitchen backsplash design for 2024. Keeping up with trends can help you create a kitchen that feels fresh and modern.

    Staying on top of trends doesn’t mean you have to follow them all – pick the ones that speak to you and your style.

    Current Trends

    1. Eco-Conscious Materials

    More and more homeowners are looking for eco-friendly options for their backsplashes. This might mean using recycled glass tiles or choosing materials from sustainable sources. It’s a great way to make your kitchen look good while doing good for the planet.

    Going green with your backsplash is like giving Mother Nature a high-five every time you cook.

    2. Dramatic Stone Slabs

    Big, bold stone slabs are making a splash in kitchen design. Instead of small tiles, imagine a single piece of marble or quartz stretching across your backsplash. It’s a look that’s both dramatic and elegant.

    A stone slab backsplash is like a giant canvas for nature’s artwork, bringing a wow factor to your kitchen.

    3. Geometric Patterns

    Say goodbye to boring backsplashes! Geometric patterns are in, adding visual interest and a modern touch to kitchens. Think hexagons, diamonds, or even 3D-looking designs that pop.

    Geometric patterns can turn your backsplash into an eye-catching puzzle that keeps your kitchen looking fresh and fun.

    4. Mixed Materials

    Why choose just one material when you can mix and match? Combining different textures and materials in your backsplash creates a unique, personalized look. You might pair sleek glass tiles with rustic stone, for example.

    Mixing materials in your backsplash is like creating a collage – each piece adds its flavor to the overall picture.

    5. Monochromatic Palettes

    For a sleek, sophisticated look, monochromatic color schemes are trending. This doesn’t mean your backsplash has to be boring, though. You can play with different shades and textures within the same color family for a subtle but stunning effect.

    A monochromatic backsplash is like a whisper in a noisy room – it catches your attention with its quiet elegance.

    Color Schemes

    Color can make or break your kitchen backsplash. The right hue can tie your whole kitchen together, while the wrong one can throw everything off. Here’s what’s trending in backsplash colors for 2024:

    Choosing the right color for your backsplash is like picking the perfect outfit – it should make you feel good every time you see it.

    Trending Colors

    1. Earthy Neutrals

    Warm, earthy tones are having a moment. Think soft beiges, warm greys, and subtle terracottas. These colors create a cozy, welcoming vibe in your kitchen and pair well with both light and dark cabinets.

    Earthy neutrals bring the calm, grounding feeling of nature into your kitchen, making it a soothing space to cook and gather.

    2. Bold and Vibrant Hues

    On the flip side, some homeowners are going all out with bold, vibrant colors. Deep blues, rich greens, and even bright yellows are showing up in kitchen backsplashes. These eye-catching hues can turn your backsplash into a real focal point.

    A bold-colored backsplash is like a burst of energy for your kitchen, adding excitement and personality to the space.

    3. Pastel Shades

    For a softer look, pastel shades are making a comeback. Soft pinks, light blues, and pale greens can add a touch of color without overwhelming the space. They’re especially popular in vintage-inspired or cottage-style kitchens.

    Pastel backsplashes are like a gentle hug for your kitchen, adding warmth and charm without shouting for attention.

    Patterns and Textures

    A perfect kitchen backsplash isn’t just about color – patterns and textures play a big role too. The right pattern can add depth and interest to your kitchen, while textures can create a tactile experience that makes your space feel more dynamic.

    Patterns and textures are like the spices in your cooking – they add flavor and interest to your kitchen’s design.

    Popular Patterns

    1. Herringbone

    The herringbone pattern is a classic that’s seeing a big resurgence. It’s a great way to add visual interest without going overboard. You can create this zigzag pattern with any type of tile, from subway tiles to natural stone.

    A herringbone pattern backsplash is like a classic dance move – it never goes out of style and always looks impressive.

    2. Chevron

    Similar to herringbone but with a sharper angle, the chevron pattern is perfect for modern kitchens. It creates a sense of movement and can make your kitchen feel larger.

    Chevron patterns add a zing to your backsplash, like a bolt of energy running through your kitchen.

    3. Mosaic Designs

    Mosaic tiles offer endless possibilities for creating unique patterns. From intricate floral designs to abstract art pieces, mosaics let you turn your backsplash into a true work of art.

    A mosaic backsplash is like a jigsaw puzzle come to life, with each tiny piece contributing to a stunning bigger picture.

    Don’t forget about texture! Even if you’re sticking with a simple color scheme, adding textured tiles can create depth and interest. Raised patterns, 3D tiles, or even mixed materials can add a tactile element to your backsplash that catches both the eye and the hand.

    Textured backsplashes add a touch-me factor to your kitchen, inviting you to reach out and feel the beauty.

    Maintenance and Durability

    When choosing your perfect kitchen backsplash, it’s not all about looks. You’ve got to think about how it’ll hold up over time and how much elbow grease you’ll need to keep it looking great.

    A low-maintenance backsplash is like a good friend – it looks great without demanding too much time and energy.

    Material Durability

    1. Easy-to-Clean Options

    If you’re not a fan of scrubbing, go for materials that are easy to wipe down. Glass and glazed ceramic tiles are champs in this department. A quick swipe with a damp cloth is usually all they need to stay sparkling.

    Easy-clean backsplashes are like magic – they seem spotless with minimal effort on your part.

    2. Long-lasting Materials

    For a backsplash that’ll stand the test of time, consider porcelain or natural stone. These materials are tough as nails and can handle heat, moisture, and the occasional kitchen mishap without breaking a sweat.

    Durable backsplash materials are like the tortoise in the race – slow and steady, they win the long game of kitchen wear and tear.

    Remember, some materials like natural stone need to be sealed regularly to keep them looking their best. Factor this into your decision if you’re not keen on extra maintenance.

    Installation Tips

    Once you’ve picked out your perfect kitchen backsplash, it’s time to think about installation. This is where the rubber meets the road – or in this case, where the tile meets the wall!

    Good installation is like a strong foundation – it ensures your beautiful backsplash will look great for years to come.

    DIY vs. Professional Installation

    Feeling handy? Installing a backsplash can be a fun DIY project. It’s a great way to save some cash and get the satisfaction of a job well done. But be honest with yourself – if you’re not confident in your skills, it might be worth calling in the pros. A poorly installed backsplash can be a real eyesore, not to mention a potential source of water damage.

    DIY installation can be rewarding, but remember – it’s okay to call in the pros if you’re unsure. Better safe than sorry!

    If you do decide to go the DIY route, make sure you’ve got all the right tools and materials before you start. And don’t forget to prep your walls properly – a smooth, clean surface is key to a great-looking backsplash.

    For more complex designs or materials, professional installation is often the way to go. An experienced installer can handle tricky cuts, ensure everything’s level, and give you that polished, professional look.

    Cost Considerations

    Let’s talk money. Your perfect kitchen backsplash doesn’t have to break the bank, but it’s good to know what you’re getting into budget-wise.

    Budgeting for your backsplash is like planning a meal – you want to get the best ingredients you can afford without overspending.

    Budget-Friendly Options

    If you’re watching your pennies, ceramic tiles are usually your best bet. They come in a wide range of styles and colors, so you can get a great look without spending a fortune. Vinyl decals or peel-and-stick tiles are even cheaper options that can give you a quick backsplash fix on a shoestring budget.

    Budget-friendly backsplash options are like finding a great deal at a sale – you get a stylish look without emptying your wallet.

    For a mid-range option, consider glass tiles or porcelain. They offer a bit more durability and style without skyrocketing the price.

    If you’ve got some wiggle room in your budget, natural stone or handmade artisan tiles can give your kitchen that wow factor. Just keep in mind that these pricier options often come with higher installation costs too.

    Don’t forget to factor in installation costs when you’re budgeting. DIY can save you money, but if you’re not confident in your skills, the cost of professional installation is worth it to avoid costly mistakes.

    Conclusion

    Choosing the perfect kitchen backsplash is all about balancing style, function, and budget. Whether you go for classic ceramic, sleek glass, or luxurious natural stone, your backsplash is a chance to add personality to your kitchen. Remember to consider durability and maintenance alongside aesthetics. And don’t be afraid to mix things up with bold colors or interesting patterns – after all, your kitchen should reflect your unique style. With the right backsplash, you can transform your kitchen from bland to grand. So go ahead, make a splash with your backsplash!

    Your backsplash is the finishing touch that ties your whole kitchen together, like the perfect seasoning in a delicious meal. Take your time, explore your options, and choose something that makes you smile every time you walk into your kitchen. After all, a happy cook makes the best food!

  • Budget-Friendly Kitchen Remodel Ideas You’ll Love

    Budget-Friendly Kitchen Remodel Ideas You’ll Love

    Are you dreaming of a kitchen makeover but worried about the cost? Don’t fret! With some clever budget-friendly kitchen remodel ideas, you can breathe new life into your cooking space without emptying your wallet. Whether you’re looking to update a few elements or completely overhaul your kitchen, there are plenty of affordable options to create a stylish and functional space.

    Let’s dive into some cost-effective kitchen renovation strategies that’ll have you cooking up a storm in no time!

    Introduction to Affordable Kitchen Renovations

    A kitchen remodel doesn’t have to cost a fortune. In fact, with some creativity and smart planning, you can achieve a stunning transformation on a shoestring budget. The key is to focus on high-impact changes that don’t require major structural alterations. By prioritizing your needs and making strategic choices, you can create a kitchen that looks like a million bucks without the hefty price tag.

    But where do you start? Well, it’s all about being savvy with your choices and knowing where to splurge and where to save. From refacing cabinets to choosing budget-friendly countertops, there are countless ways to stretch your remodeling dollars. And the best part? Many of these affordable kitchen upgrades can be done as DIY projects, saving you even more money in the process.

    Top Cost-Effective Remodeling Strategies

    1. Refacing vs. Replacing Cabinets

    One of the biggest expenses in a kitchen renovation is often the cabinetry. But here’s a secret: you don’t always need to replace your cabinets entirely. Cabinet refacing is a fantastic budget-friendly alternative that can give your kitchen a whole new look for a fraction of the cost.

    Refacing involves keeping the existing cabinet boxes and just replacing the doors and drawer fronts. You can also add a fresh veneer to the exposed frames for a cohesive look. This approach not only saves money but also reduces waste, making it an eco-friendly kitchen remodel option.

    If your cabinets are in good shape structurally, refacing can be a game-changer. It’s like giving your kitchen a facelift without the hefty price tag of a full cabinet replacement. Plus, you’ll have more money left over for other exciting upgrades!

    2. Budget-Friendly Countertop Options

    Countertops can make or break a kitchen’s appearance, but they don’t have to break the bank. There are several affordable countertop materials that can give you the look of luxury without the high-end price.

    Laminate countertops have come a long way in recent years. Modern laminates can mimic the look of stone or wood so convincingly that your guests might not even notice the difference. They’re durable, easy to clean, and come in a wide range of colors and patterns.

    Another great option is the butcher block. It adds warmth to your kitchen and can be quite affordable, especially if you’re willing to do some of the work yourself. With proper care, butcher block countertops can last for years and even improve with age.

    For those who love the look of stone but not the price tag, consider tile countertops. Ceramic or porcelain tiles can be incredibly budget-friendly and offer endless design possibilities. Plus, if a tile gets damaged, you can easily replace just that one piece instead of the entire countertop.

    3. Affordable Flooring Solutions

    Flooring is another area where you can save big without sacrificing style. Vinyl flooring has made huge strides in quality and appearance. Today’s vinyl can realistically mimic the look of hardwood, stone, or tile at a fraction of the cost. It’s also water-resistant and easy to maintain, making it perfect for busy kitchens.

    If you’re set on the look of hardwood, consider laminate flooring. It’s more affordable than real wood and can withstand the high traffic and occasional spills of a kitchen environment. Modern laminates are incredibly realistic and come in a variety of wood-look finishes.

    For the DIY enthusiast, peel-and-stick tiles can be a fun and budget-friendly option. They come in various designs and are relatively easy to install. Just make sure to properly prepare your subfloor for the best results.

    DIY Kitchen Upgrades

    1. Painting Cabinets and Walls

    One of the most impactful and budget-friendly kitchen remodel ideas is a fresh coat of paint. Painting kitchen cabinets can completely transform the look of your space without the need for expensive replacements. Opt for light colors to make your kitchen feel larger and brighter, or go bold with a trendy hue for a modern touch.

    Don’t forget about the walls! A new wall color can tie your whole kitchen together. Consider using semi-gloss or satin finish paint for easy cleaning in this high-traffic area. And here’s a pro tip: painting an accent wall can add depth and interest to your kitchen without the need for costly architectural changes.

    2. Installing New Hardware

    It’s amazing how much difference new cabinet hardware can make. Swapping out old knobs and pulls for modern ones is like adding jewelry to your kitchen. This small change can update the entire look of your cabinetry at a minimal cost.

    When choosing new hardware, consider the overall style of your kitchen. Sleek, brushed nickel pulls can give a contemporary feel, while vintage-inspired brass knobs might be perfect for a farmhouse-style kitchen. Mix and match for a unique, custom look that reflects your style.

    3. Adding Open Shelving

    Open shelving is not only trendy but also a great budget-friendly way to add storage and style to your kitchen. Remove a few upper cabinets and replace them with floating shelves for an airy, open feel. This can make a small kitchen feel larger and provide an opportunity to display your favorite dishes or decorative items.

    You can create DIY open shelves using reclaimed wood for a rustic look, or opt for sleek metal brackets with glass shelves for a more modern aesthetic. Just remember to keep your displayed items organized to avoid a cluttered appearance.

    Smart Storage Solutions on a Budget

    Maximizing storage is crucial in any kitchen, especially when you’re working with a tight budget. Luckily, there are plenty of affordable storage solutions that can help you make the most of your space.

    Start by adding pull-out organizers to your existing cabinets. These can dramatically increase the usability of deep cabinets and corner spaces. You can find affordable options at most home improvement stores, and they’re usually easy to install yourself.

    Don’t overlook the inside of cabinet doors. Adding hooks or small racks to the inside of doors can create extra storage for items like measuring cups, pot lids, or cleaning supplies. This utilizes space that often goes unused and keeps your countertops clutter-free.

    Consider adding a pegboard to one wall for a versatile and budget-friendly storage solution. You can hang pots, pans, and utensils, and easily rearrange them as your needs change. Paint the pegboard to match your kitchen for a cohesive look.

    Lighting Updates for Maximum Impact

    Good lighting can make or break a kitchen’s ambiance, and updating your lighting fixtures is an easy way to add style without spending a fortune. Start by swapping out outdated fixtures for more modern options. Pendant lights over an island or under-cabinet lighting can add both function and flair to your kitchen.

    Don’t forget about natural light! If possible, enlarge or add windows to brighten up your space. If structural changes aren’t in the budget, consider adding a mirror to reflect existing light and make your kitchen feel larger and brighter.

    For a budget-friendly option, try LED strip lights. These can be added under cabinets or along toe kicks for a modern, high-end look at a fraction of the cost of traditional undercabinet lighting.

    Energy-Efficient Appliance Upgrades

    While appliances can be a significant expense, investing in energy-efficient models can save you money in the long run through lower utility bills. Look for appliances with the ENERGY STAR label, which indicates they meet strict energy efficiency guidelines set by the U.S. Environmental Protection Agency and the U.S. Department of Energy.

    If replacing all your appliances isn’t in the budget, start with the ones that use the most energy, like the refrigerator or dishwasher. You might be surprised at how much you can save on your energy bills by upgrading even one appliance.

    Don’t forget about smaller appliances too. An energy-efficient microwave or toaster oven can be a more economical choice for reheating or cooking small meals compared to using your full-sized oven.

    Creative Backsplash Ideas

    A new backsplash can add a pop of color and personality to your kitchen without breaking the bank. Peel-and-stick tiles have come a long way in recent years and can be a great DIY option for a budget-friendly backsplash. They come in a variety of styles and patterns, from subway tile looks to intricate mosaics.

    If you’re feeling crafty, consider creating a unique backsplash using unconventional materials. Painted wooden planks, tin ceiling tiles, or even wallpaper covered with clear glass can create stunning, one-of-a-kind backsplashes on a budget.

    For a sleek, modern look, consider using large-format tiles. These can be more affordable than smaller tiles and create a clean, uncluttered appearance. Plus, with fewer grout lines to clean, they’re easier to maintain.

    Maximizing Small Kitchen Spaces

    Working with a small kitchen? No problem! There are plenty of budget-friendly ideas to make the most of your compact space. Start by decluttering and organizing your kitchen to free up valuable real estate.

    Use vertical space to your advantage. Install a pot rack to hang cookware from the ceiling, or add a magnetic knife strip to a wall to free up drawer space. Over-the-door organizers can turn the back of a pantry door into valuable storage space.

    Consider a rolling kitchen cart or island for added counter space and storage that can be moved out of the way when not in use. This flexible solution can be particularly useful in small kitchens where every inch counts.

    Eco-Friendly Remodel Options

    An eco-friendly kitchen remodel doesn’t have to cost the earth. Many sustainable options can be quite budget-friendly. Consider using recycled materials where possible. Reclaimed wood can be used for open shelving or even countertops, adding character to your kitchen while being environmentally conscious.

    When choosing new products, look for those made from sustainable materials like bamboo or cork. These renewable resources can be used for flooring, cabinetry, or even small accessories.

    Don’t forget about water conservation. Installing a low-flow faucet aerator is an inexpensive way to reduce water usage without sacrificing water pressure. And if you’re replacing your dishwasher, choose a water-efficient model to save on both water and energy bills.

    Planning Your Budget-Friendly Kitchen Remodel

    1. Setting Priorities

    Before you start your remodel, it’s crucial to set clear priorities. What aspects of your kitchen bother you the most? What changes would make the biggest impact on your daily life? By focusing on these key areas, you can ensure you’re spending your budget where it matters most.

    Make a list of must-haves and nice-to-haves. This will help you allocate your budget effectively and avoid overspending on less important items. Remember, a budget-friendly kitchen remodel is all about making smart choices that give you the most bang for your buck.

    2. Creating a Timeline

    A well-planned timeline can help keep your kitchen renovation on track and within budget. Start by deciding when you want the project completed and work backward from there. Be realistic about how long each phase will take, especially if you’re doing some of the work yourself.

    Consider the order of operations. For example, if you’re painting cabinets, this should be done before installing new countertops or backsplash. A clear timeline can help prevent costly mistakes and keep your project moving smoothly.

    3. Hiring vs. DIY

    Deciding what to DIY and what to leave to the professionals is a crucial part of planning a budget-friendly kitchen remodel. While DIY can save money, it’s important to be honest about your skills and the time you have available.

    Simple tasks like painting, installing hardware, or even laying peel-and-stick flooring can often be done by homeowners. However, for more complex jobs like electrical work or plumbing, it’s usually best (and safest) to hire a professional. Remember, a botched DIY job can end up costing more in the long run if you have to hire someone to fix your mistakes.

    Inspiring Budget Kitchen Transformations

    Nothing inspires quite like seeing real-life transformations. Let’s look at a couple of budget-friendly kitchen remodel success stories:

    The Johnson family transformed their dated 1980s kitchen into a modern farmhouse dream on a tight budget. They painted their existing cabinets a crisp white, added new hardware, and installed a butcher block countertop. A peel-and-stick backsplash in a classic subway tile pattern completed the look. Total cost? Just under $3,000.

    Meanwhile, the Garcias took a different approach with their small galley kitchen. They removed the upper cabinets on one side and replaced them with open shelving, instantly making the space feel larger. A fresh coat of paint, new vinyl flooring, and updated lighting fixtures gave the kitchen a whole new look for less than $2,500.

    These examples show that with some creativity and elbow grease, you can achieve stunning results without breaking the bank.

    Conclusion

    Embarking on a budget-friendly kitchen remodel doesn’t mean you have to sacrifice style or functionality. By focusing on high-impact changes, getting creative with materials, and not being afraid to roll up your sleeves for some DIY work, you can transform your kitchen into a space you love without emptying your savings account.

    Remember, the key to a successful budget remodel is careful planning, setting clear priorities, and being willing to think outside the box. Whether you’re updating a few elements or giving your kitchen a complete overhaul, these ideas can help you create a beautiful, functional space that fits your style and your budget.

    So, are you ready to start your affordable kitchen renovation? With these tips and ideas, you’re well on your way to cooking up the kitchen of your dreams without the nightmare of overspending. Happy remodeling!

  • How to Create a Functional Kitchen Island

    How to Create a Functional Kitchen Island

    Ever dreamed of a kitchen that’s not just a place to cook, but a hub of activity, style, and efficiency? Well, you’re in luck! A functional kitchen island might just be the secret ingredient your home’s been missing. It’s like having a Swiss Army knife in the middle of your kitchen – versatile, practical, and oh-so-handy.

    Let’s dive into the world of kitchen islands and discover how they can transform your cooking space from drab to fab!

    What’s All the Fuss About Kitchen Islands?

    You’re in the middle of whipping up a storm for dinner, and everything you need is right at your fingertips. That’s the magic of a functional kitchen island. It’s not just a pretty face in your kitchen; it’s a workhorse that can handle everything from chopping veggies to hosting impromptu family gatherings.

    These islands have come a long way from their humble beginnings as simple wooden tables. Now, they’re the centerpiece of modern kitchens, offering a perfect blend of style and substance. Whether you’re a culinary wizard or a microwave maestro, a kitchen island can make your life easier and your kitchen more inviting.

    But what makes a kitchen island truly functional? It’s all about how it fits into your life and your space. From extra storage to a spot for quick breakfasts, these islands are like chameleons, adapting to whatever you need them to be. And the best part? They come in all shapes and sizes, so there’s one out there that’s perfect for your kitchen, no matter how big or small.

    Key Features That Make Islands Shine

    1. Storage Solutions

    Let’s face it, we all have that one drawer (or maybe several) stuffed with gadgets we rarely use. A functional kitchen island can be your secret weapon in the battle against clutter. With smart storage solutions, you can keep everything from pots and pans to your prized collection of spices within easy reach.

    Think about adding deep drawers for those bulky items that never seem to fit anywhere else. Or how about some open shelving to show off your favorite cookbooks and pretty dishes? Some islands even come with built-in wine racks or spice pull-outs, turning the organization into an art form.

    And let’s not forget about those pesky small appliances that eat up counter space. Many islands now feature appliance garages – clever little nooks where you can tuck away your toaster or coffee maker when they’re not in use. It’s like giving your kitchen a mini makeover every time you clear the counters!

    2. Seating Arrangements

    Gone are the days when the kitchen was just for cooking. Now, it’s where all the action happens. A functional kitchen island with the right seating arrangement can turn your kitchen into the ultimate hangout spot.

    Adding a few bar stools or high chairs to your island creates an instant casual dining area. It’s perfect for quick breakfasts, after-school snacks, or even as a homework station where you can keep an eye on the kids while you cook.

    For larger families or those who love to entertain, consider an island with an extended countertop or a two-tier design. This gives you plenty of space for people to gather around without getting in the way of your food prep. It’s like having a mini-party every night!

    3. Integrated Appliances

    Why stop at storage and seating when your island can do so much more? Integrated appliances take your kitchen island from useful to downright indispensable.

    Imagine having a cooktop right in the middle of your island. You can chat with your guests or keep an eye on the kids while stirring up your famous pasta sauce. Or how about a built-in sink? It makes food prep and clean-up a breeze, especially when you’re dealing with multiple dishes.

    For the tech-savvy chef, some islands now come with smart appliances like refrigerator drawers or even touchscreen displays for looking up recipes. It’s like having a sous chef right at your fingertips!

    Why Your Kitchen Needs an Island ASAP

    Adding a functional kitchen island to your space is like giving your kitchen superpowers. Here’s why you’ll wonder how you ever lived without one:

    1. Extra workspace: No more playing Tetris with your cutting boards and mixing bowls. An island gives you ample space to spread out and get creative.
    2. Improved flow: With a well-placed island, you can create an efficient work triangle between your sink, stove, and fridge. It’s like choreographing a culinary dance!
    3. Social central: Islands naturally draw people together. It’s the perfect spot for casual meals, homework sessions, or just hanging out while someone cooks.
    4. Storage galore: From pots and pans to rarely-used gadgets, an island can house it all, keeping your kitchen clutter-free and organized.
    5. Increased home value: A stylish and functional island can be a major selling point if you ever decide to move. It’s an investment that pays off in more ways than one.

    Design Ideas to Make Your Island Fantastic

    1. Space-Saving Strategies for Any Kitchen

    Think your kitchen’s too small for an island? Think again! There are plenty of space-saving strategies to make an island work in even the coziest of kitchens.

    For tight spaces, consider a mobile island on wheels. It’s there when you need it and can be tucked away when you don’t. Or how about a narrow island that provides just enough extra counter space without cramping your style?

    Another clever trick is the peninsula island. It’s attached to one wall but still gives you that island feel, perfect for kitchens where space is at a premium. And don’t forget about multi-level islands – they can provide different work surfaces without taking up extra floor space.

    2. Material Choices

    The materials you choose for your island can make or break its look and functionality. From classic wood to sleek stainless steel, the options are endless.

    For a timeless look, you can’t go wrong with a granite countertop. It’s durable, heat-resistant, and comes in a variety of colors. If you’re after something more modern, consider quartz or concrete – they’re both tough as nails and can be customized to fit any style.

    Don’t forget about the base of your island! Painted wood can add a pop of color to your kitchen, while reclaimed materials bring in a touch of rustic charm. Mix and match materials for a truly unique look that reflects your personality.

    3. Smart Kitchen Island

    Welcome to the future of Kitchen Islands! Smart technology is making its way into every corner of our homes, and islands are no exception.

    Imagine an island with built-in charging stations for your devices, or a touchscreen display for looking up recipes and watching cooking tutorials. Some high-tech islands even come with temperature-controlled drawers for keeping your ingredients at just the right temperature.

    For the eco-conscious, there are islands with energy-efficient LED lighting built right in. And let’s not forget about voice-activated features – adjusting your island’s height or turning on the sink with just a word is no longer science fiction!

    Multi-Purpose Islands That Do It All

    Who says an island has to stick to just one job? Multi-purpose kitchen islands are all the rage, and for good reason. They’re like the Swiss Army knives of the kitchen world – ready for anything you throw at them.

    Think about an island that’s part prep station, part dining table. With a drop-leaf extension, you can go from chopping veggies to hosting a dinner party in seconds. Or how about an island that doubles as a home office? With the right setup, you can go from sending emails to sautéing onions without missing a beat.

    For the home baker, consider an island with a built-in baking station. A marble top for rolling out dough, storage for your mixers and baking sheets, and even a proofing drawer for your bread – it’s like having your own mini bakery right in your kitchen!

    And let’s not forget about entertainment. An island with a built-in wine fridge and glass storage turns your kitchen into the perfect spot for happy hour. Add a pop-up TV or tablet stand, and you’ve got the ultimate spot for watching cooking shows while you whip up your masterpieces.

    Kitchen Islands as Command Centers

    A well-designed functional kitchen island isn’t just about looks – it’s about making your life easier. Think of it as the command center of your kitchen, helping you move through your cooking tasks with the grace of a seasoned chef.

    The key is in the layout. By positioning your island strategically, you can create an efficient work triangle between your sink, stove, and refrigerator. This means less running around and more time cooking (or eating!).

    Consider adding a prep sink to your island. It’s perfect for washing vegetables or filling pots, without getting in the way of the main sink. And if you’re serious about your cooking, a second dishwasher on the island can be a game-changer for big meals or parties.

    Don’t forget about task lighting. Pendant lights or under-cabinet LEDs can turn your island into a well-lit workspace, perfect for detailed tasks like chopping herbs or decorating cakes. It’s like having your spotlight for culinary stardom!

    Finding Your Island Vibe

    When it comes to functional kitchen islands, there’s no one-size-fits-all solution. The style you choose should reflect your personality and complement your kitchen’s overall look. Here are some popular styles to get your creative juices flowing:

    1. Farmhouse Chic: Think rustic wood, apron sinks, and vintage hardware. It’s like bringing a cozy country cottage right into your kitchen.
    2. Modern Minimalist: Clean lines, sleek surfaces, and hidden storage. Perfect for those who love a clutter-free, contemporary look.
    3. Industrial Edge: Metal accents, exposed pipes, and raw materials give your kitchen a cool, urban loft vibe.
    4. Coastal Cool: Light colors, beadboard details, and nautical touches bring a breezy, beach house feel to your space.
    5. Eclectic Mix: Why choose one style when you can have them all? Mix and match elements for a truly unique island that’s all you.

    Remember, the best style is the one that makes you smile every time you walk into your kitchen. After all, a functional kitchen island should be as much about joy as it is about practicality.

    Making Your Island Uniquely Yours

    The beauty of a functional kitchen island is that it can be tailored to fit your exact needs and wants. It’s like having a custom-made suit for your kitchen – perfectly fitted and oh-so-stylish.

    Start by thinking about what you need from your island. Are you all about baking? Consider a marble top for rolling out dough. Love to entertain? Maybe a built-in ice maker or wine fridge is in order.

    Don’t be afraid to get creative with storage solutions. Pull-out trash bins, vertical storage for baking sheets, or even a hidden pet feeding station – if you can dream it, you can probably incorporate it into your island.

    And let’s talk about personalization. From custom hardware to unique tile work, there are countless ways to make your island stand out. How about a chalkboard end panel for leaving family messages or your daily menu? Or a built-in herb garden for fresh flavors at your fingertips?

    Different Kitchen Islands Layouts

    Whether your kitchen is as big as a ballroom or cozy as a closet, there’s an island layout that can work for you. It’s all about finding the right fit for your space and your lifestyle.

    For galley kitchens, a long, narrow island can provide extra workspace without cramping your style. In L-shaped kitchens, an island can help define the space and create a natural flow.

    Got a big, open kitchen? Lucky you! You might have room for a multi-functional island with different zones for prepping, cooking, and dining. Or consider double islands – one for work and one for play.

    And don’t forget about odd-shaped kitchens. A custom-designed island can fill awkward spaces and make your kitchen more functional. It’s like solving a puzzle, with delicious results!

    Keeping Your Island in Tip-Top Shape

    A functional kitchen island is an investment, and like any investment, it needs a little TLC to keep it looking and working its best. But don’t worry – it’s not rocket science!

    For countertops, the key is regular cleaning and sealing (if needed). Wipe up spills promptly, and use cutting boards to protect the surface. If you’ve got a wooden island, a little oil now and then will keep it looking gorgeous.

    Hardware might need tightening occasionally, and drawers could use a good clean-out (we all have that one junk drawer, right?). And if you’ve got integrated appliances, follow the manufacturer’s care instructions to keep them humming along.

    Remember, a little maintenance goes a long way. Treat your island right, and it’ll be the heart of your kitchen for years to come!

    Wrapping It Up

    A functional kitchen island is more than just a piece of furniture – it’s a game-changer for your home. From extra storage and workspace to a social hub for family and friends, an island can transform your kitchen into the heart of your home.

    Whether you’re a gourmet chef or a microwave master, there’s an island out there that’s perfect for you. So why wait? Start dreaming up your ideal island today, and get ready to fall in love with your kitchen all over again!

  • Small Kitchen Remodeling Ideas to Maximize Space

    Small Kitchen Remodeling Ideas to Maximize Space

    Are you tired of your cramped, outdated kitchen? Small kitchen remodeling might be just what you need. It’s not about the size of your space, but how you use it. With the right approach, even the tiniest kitchen can become a culinary haven.

    Let’s dive into the world of kitchen renovation and discover how to transform your compact cooking area into a functional and stylish masterpiece.

    Understanding Small Kitchen Spaces

    Small kitchens are like puzzles waiting to be solved. They’re challenging, but with the right pieces, you can create a beautiful picture. The key is to understand your space and its potential.

    First, take a good look at your kitchen. What’s working? What’s not? Maybe that awkward corner could become a cozy breakfast nook. Or perhaps that blank wall is begging for some open shelving. It’s all about seeing possibilities where others see limitations.

    Remember, a small kitchen isn’t a curse. It’s an opportunity to get creative. Think of it as a chance to curate your space, keeping only what you truly need and love. After all, who needs five different types of whisks anyway?

    Planning Your Remodel

    Planning is where the magic happens. It’s like preparing for a grand adventure. You wouldn’t set off on a journey without a map, would you? The same goes for kitchen remodeling.

    Start by setting clear goals. What do you want to achieve with your small kitchen renovation? More storage? Better flow? A brighter space? Write it all down. This will be your roadmap throughout the remodeling process.

    Next, consider your budget. Kitchen remodel costs can vary wildly, so it’s important to know your limits. But don’t worry, there are plenty of budget-friendly kitchen remodel options out there. From DIY kitchen cabinet painting to clever IKEA kitchen solutions, you can make a big impact without breaking the bank.

    Don’t forget to think about your lifestyle. Are you a gourmet chef or a microwave maestro? Do you need space for entertaining or just for your morning coffee ritual? Your kitchen should reflect how you live, not just how it looks in a magazine.

    Cost Breakdown

    Let’s talk money. It’s not the most exciting part of a kitchen renovation, but it’s crucial. The good news? Small kitchen remodels costs are typically lower than their larger counterparts.

    According to recent data, the average cost to remodel a kitchen under 250 square feet ranges from $13,000 to $50,000. That’s quite a range, right? The final cost depends on factors like the scope of your project, the quality of materials, and whether you’re hiring pros or going the DIY route.

    Here’s a rough breakdown:

    • Cabinets: 30-35% of your budget
    • Appliances: 20-25%
    • Countertops: 10-15%
    • Labor: 20-35%

    Remember, these are just averages. Your kitchen remodel cost might be higher or lower depending on your specific needs and choices.

    Want to save some cash? Consider refacing cabinets instead of replacing them. Or opt for budget-friendly kitchen makeover ideas like painting walls or updating hardware. Every little bit helps!

    Design Trends for 2025

    Exciting times are ahead in the world of kitchen design! The trends for 2025 are all about making the most of small spaces while adding a touch of luxury.

    Layered designs are taking center stage. It’s all about mixing textures and colors to create depth and interest. Think textured wood cabinets paired with sleek countertops. Or try combining different cabinet colors for a unique look.

    Matching countertops and backsplashes are another hot trend. This creates a seamless look that can make your small kitchen feel larger and more cohesive. Imagine a beautiful marble-inspired surface flowing from your counters right up the wall. Talk about the wow factor!

    Large format tiles are making a big splash in small spaces. They can make your kitchen feel more open and airy. Plus, fewer grout lines mean easier cleaning. Win-win!

    Don’t be afraid of moody colors in 2025. Deep, rich hues like forest green or navy blue can add drama and sophistication to your small kitchen. They’re especially effective in spaces with limited natural light, creating a cozy, intimate atmosphere.

    Remember, trends come and go. The most important thing is to create a kitchen that you love and that works for your lifestyle.

    Maximizing Functionality

    In a small kitchen, every inch counts. It’s like playing Tetris with your space – you want everything to fit just right.

    Start by thinking vertically. Wall-mounted storage can be a game-changer in a compact kitchen. Install floating shelves or a pegboard to keep frequently used items within easy reach. This frees up valuable counter space and adds visual interest to your walls.

    Consider multi-functional furniture. A rolling island can serve as extra counter space, storage, and even a dining table. Talk about a triple threat!

    Don’t forget about those awkward corners. Lazy Susans or pull-out organizers can turn these tricky spots into storage powerhouses. No more digging through the back of cabinets for that elusive pot lid!

    Lighting is another key player in maximizing functionality. Good lighting can make your small kitchen feel larger and more inviting. Under-cabinet lights, for example, not only brighten up your workspace but also add a touch of ambiance.

    Remember, a functional kitchen works for you. Think about your cooking habits and design your space accordingly. Maybe you need a dedicated coffee station or a pull-out spice rack. It’s all about making your kitchen work smarter, not harder.

    Material Selection

    Choosing materials for your small kitchen remodel is like picking ingredients for a recipe. The right combination can create something truly special.

    For countertops, consider durable materials that can stand up to daily wear and tear. Quartz countertops are a popular choice, offering both beauty and practicality. They’re non-porous, making them resistant to stains and bacteria – perfect for busy kitchens.

    When it comes to cabinets, wood remains a favorite. It’s versatile, timeless, and can be painted or stained to suit your style. For a modern twist, consider cabinets with a textured wood finish. They add depth and interest to your space without overwhelming it.

    Flooring is another important consideration. In a small kitchen, large format tiles or planks can make the space feel bigger. Luxury vinyl tile (LVT) is gaining popularity for its durability, water resistance, and wide range of design options.

    Don’t forget about your backsplash! This is a great opportunity to add personality to your kitchen. Large format tiles are trending, creating a sleek, seamless look. Or, for a budget-friendly option, consider a peel-and-stick backsplash. They’re easy to install and can be changed out when you’re ready for a new look.

    Remember, in a small kitchen, it’s important to strike a balance. Choose materials that complement each other without overwhelming the space. And always consider practicality alongside aesthetics. After all, a beautiful kitchen isn’t much use if it’s not functional!

    DIY vs. Professional Remodeling

    To DIY or not to DIY? That is the question. When it comes to small kitchen remodeling, there’s no one-size-fits-all answer.

    DIY can be a great option if you’re handy and working with a tight budget. Tasks like painting cabinets, installing new hardware, or updating light fixtures are often within the realm of a confident DIYer. Plus, there’s a certain satisfaction in pointing to your beautiful new kitchen and saying, “I did that!”

    However, some aspects of a kitchen renovation are best left to the pros. Anything involving plumbing, electrical work, or major structural changes should be handled by licensed professionals. It’s not just about skill – it’s about safety and compliance with local building codes.

    According to recent statistics, 89% of homeowners hire a pro for their renovation project. The most popular professional hired is a general contractor (53%), followed by a cabinet maker (31%).

    If you do decide to go the professional route, do your homework. Get multiple quotes, check references, and make sure you’re comfortable with your chosen contractor. A good professional can bring expertise, efficiency, and peace of mind to your kitchen remodel.

    Remember, whether you DIY or hire a pro, the goal is the same: a beautiful, functional kitchen that you’ll love for years to come.

    ROI and Home Value Impact

    Let’s talk about the bottom line. A small kitchen remodel isn’t just about creating a space you love – it can also be a smart financial move.

    According to recent data, the ROI for a minor kitchen remodel is about 77.6%. That means if you spend $20,000 on your renovation, you could potentially increase your home’s value by around $15,520. Not too shabby!

    But it’s not just about resale value. A well-designed kitchen can make your daily life easier and more enjoyable. And in a small kitchen, smart renovations can make a big impact on functionality and aesthetics.

    Certain upgrades tend to offer better ROI than others. Updating appliances, refacing cabinets, and installing new countertops often provide good returns. On the other hand, super high-end or highly personalized features might not appeal to all buyers.

    Remember, if you’re remodeling with resale in mind, it’s best to stick with neutral, timeless designs. But if you plan to stay in your home for a while, don’t be afraid to create a kitchen that truly reflects your style and needs.

    Timeline and Project Management

    Time is money, especially when it comes to kitchen remodeling. A well-planned timeline can help keep your project on track and within budget.

    On average, a minor kitchen remodel takes about 3 to 6 weeks. But remember, every project is unique. Factors like the scope of work, availability of materials, and unexpected issues can all impact your timeline.

    Here’s a rough breakdown of a typical kitchen renovation timeline:

    1. Planning and design: 2-3 weeks
    2. Demolition: 1-2 days
    3. Structural work (if needed): 1-2 weeks
    4. Electrical and plumbing: 2-3 days
    5. Installation of cabinets and countertops: 1-2 weeks
    6. Flooring installation: 1-2 days
    7. Backsplash installation: 1-2 days
    8. Painting: 1-2 days
    9. Final touches and cleanup: 1-2 days

    Good project management is key to staying on schedule. If you’re working with a contractor, make sure they provide a detailed timeline and keep you updated on progress. If you’re DIYing, create a schedule and try to stick to it as much as possible.

    Remember, flexibility is important. Unexpected issues can arise in any renovation project. Build some buffer time into your schedule to account for these potential hiccups.

    Common Challenges and Solutions

    Every small kitchen remodel comes with its own set of challenges. But don’t worry – for every problem, there’s a solution!

    One common challenge is limited storage space. The solution? Get creative! Use vertical space with tall cabinets or open shelving. Install pull-out organizers in your cabinets to maximize every inch. Consider a pantry cabinet or even a walk-in pantry if space allows.

    Another frequent issue is poor lighting. In a small kitchen, good lighting is crucial. Install under-cabinet lights to brighten work areas. Consider a statement light fixture over an island or dining area to add both illumination and style.

    Lack of counter space is another typical complaint. One solution is to install a rolling island that can be moved as needed. Or consider a fold-down table that can serve as extra prep space when needed and be tucked away when not in use.

    Finally, many homeowners struggle with outdated or mismatched appliances. If a full appliance upgrade isn’t in the budget, consider panel-ready appliances that can be covered to match your cabinets. This creates a seamless, cohesive look.

    Remember, every challenge is an opportunity for a creative solution. With some ingenuity and planning, you can overcome any obstacle in your small kitchen remodeling journey.

    Conclusion

    Small kitchen remodeling is an exciting journey that can transform your space and enhance your daily life. From understanding your space to choosing materials and managing your project, there’s a lot to consider. But with careful planning and a dash of creativity, you can create a kitchen that’s both beautiful and functional, regardless of its size.

    Remember, the goal is to create a space that works for you. Whether you’re whipping up gourmet meals or just heating leftovers, your kitchen should make you smile every time you walk into it. So go ahead, dream big – even in a small space!

  • How to Choose the Right Kitchen Cabinets for Your Space

    How to Choose the Right Kitchen Cabinets for Your Space

    Choosing the right kitchen cabinets can be a daunting task. But don’t worry! We’re here to help you navigate through the sea of options and find the perfect fit for your space. Whether you’re renovating an existing kitchen or starting from scratch, the cabinets you choose will play a crucial role in defining the look, functionality, and overall feel of your culinary haven.

    So, let’s dive in and explore how to select the right kitchen cabinets for your space that not only look stunning but also cater to your specific needs and lifestyle.

    Choosing the Right Style

    When it comes to kitchen cabinet styles, the options can seem endless. But don’t let that overwhelm you! Let’s break it down into some popular choices that’ll help you narrow down your search.

    Shaker cabinets continue to be a favorite in 2024, and it’s easy to see why. Their clean lines and simple design make them versatile enough to fit into almost any kitchen aesthetic. Whether you’re going for a modern look or a more traditional vibe, shaker cabinets can adapt to your style. They’re like the chameleons of the cabinet world!

    On the other hand, if you’re after a sleek, minimalist look, flat-panel cabinets might be right up your alley. These cabinets have smooth, flat doors without any frills or decorative panels. They’re perfect for creating a clean, contemporary feel in your kitchen. Think of them as the little black dress of cabinetry – simple, elegant, and always in style.

    But hey, who says you can’t mix things up a bit? Accent cabinets are a great way to add some personality to your kitchen. You could choose a few cabinets in a contrasting color or material to create a focal point. It’s like adding a statement necklace to your outfit – it draws the eye and adds interest to the overall look.

    Understanding Kitchen Layouts

    Now, let’s talk about how your kitchen layout can influence your cabinet choices. After all, the layout is like the blueprint of your kitchen – it determines how everything fits together.

    The L-shaped kitchen layout is a popular choice, especially for smaller spaces. It’s efficient and allows for a good workflow. In this layout, cabinets are arranged along two adjacent walls, forming an L shape. This design gives you plenty of counter space and storage options while keeping everything within easy reach. It’s like having your cake and eating it too!

    For those with a bit more space to play with, the U-shaped kitchen layout might be the way to go. This layout features cabinets and countertops on three walls, creating a U shape. It’s great for larger families or those who love to cook, as it provides ample storage and work areas. Think of it as the Swiss Army knife of kitchen layouts – versatile and ready for anything.

    And let’s not forget about the G-shaped kitchen layout. This is essentially a U-shaped kitchen with an added peninsula or partial fourth wall of cabinets. It’s perfect for those who want maximum storage and counter space. It’s like the U-shaped layout’s overachieving cousin – always going that extra mile!

    Selecting Materials for Durability and Aesthetics

    When it comes to kitchen cabinet materials, you’ve got options galore. But remember, you’re not just choosing based on looks – durability is key too!

    Wood cabinets are a classic choice, and for good reason. They’re durable, versatile, and can be stained or painted to match any style. Plus, each piece of wood has its unique grain pattern, giving your kitchen a one-of-a-kind look. It’s like nature’s fingerprint in your kitchen! However, wood can be susceptible to warping in humid environments and may require more maintenance than other materials.

    If you’re looking for something a bit more budget-friendly, MDF (Medium Density Fiberboard) or plywood might be worth considering. MDF is made from wood fibers and resin, pressed together to create a dense, stable material. It’s great for painted cabinets and resists warping better than solid wood. Plywood, on the other hand, is made from thin layers of wood veneer glued together. It’s strong, lightweight, and less prone to expansion and contraction than solid wood. Think of these options as the reliable workhorses of the cabinet world – they may not be as flashy as solid wood, but they get the job done efficiently and economically.

    For those with a modern aesthetic, metal cabinets could be just the ticket. Stainless steel or aluminum cabinets are durable, easy to clean, and give your kitchen a sleek, industrial look. They’re like the cool, edgy cousin in the cabinet family – not for everyone, but making a statement!

    Color Combinations and Trends

    When it comes to kitchen cabinet colors, 2024 is all about bold choices and unexpected combinations. Don’t be afraid to step out of your comfort zone!

    One of the biggest trends in kitchen cabinets this year is the use of deep, moody colors. Navy blue, forest green, and even black are making a splash in kitchens everywhere. These rich hues add depth and sophistication to your space. It’s like giving your kitchen a touch of mystery and intrigue!

    But if you’re not ready to go all-in with dark colors, why not try the two-toned cabinet trend? This involves using one color for your upper cabinets and a different color for the lower ones. For example, you could pair white upper cabinets with navy lower cabinets for a fresh, nautical feel. Or try light gray upper cabinets with dark green lower cabinets for a nature-inspired look. It’s like creating a color-block outfit for your kitchen!

    Another trend that’s gaining traction is mixing materials for visual interest. You could combine wood cabinets with metal accents, or use glass-front cabinets to break up solid colors. This approach adds texture and depth to your kitchen design. It’s like creating a collage – each element contributes to the overall picture.

    Smart Storage Solutions

    In the world of kitchen design, storage is king. And when it comes to maximizing storage space, today’s cabinet designs are smarter than ever.

    One clever solution is the use of pull-out organizers. These nifty gadgets can transform a standard cabinet into a storage powerhouse. Imagine having all your pots, pans, and lids neatly organized and easily accessible. It’s like having a personal assistant to keep your kitchen in order!

    Corner cabinets have long been the awkward spaces of kitchens, but not anymore! Lazy Susans and pull-out corner organizers make use of every inch of these tricky spots. No more reaching into the depths of a dark corner cabinet – these solutions bring everything to you. It’s like turning that awkward cousin at family gatherings into the life of the party!

    For those who love a clutter-free countertop, appliance garages are a game-changer. These dedicated spaces can house your coffee maker, toaster, and other small appliances, keeping them easily accessible but out of sight when not in use. It’s like having a secret hideout for your kitchen gadgets!

    When considering cabinet accessibility, think about who will be using the kitchen. Lower drawers for pots and pans can be easier on the back than low cabinets. And if you have family members with mobility issues, pull-down shelving in upper cabinets can bring items within easy reach. It’s all about making your kitchen work for you, not the other way around.

    Integrating Appliances with Cabinets

    The trend toward seamless kitchen design is stronger than ever in 2024, and that means integrating your appliances with your cabinetry for a cohesive look.

    Concealed appliances are a hot trend, with refrigerators, dishwashers, and even microwaves being hidden behind cabinet panels. This creates a sleek, uninterrupted look in your kitchen. It’s like playing a grown-up version of hide-and-seek with your appliances!

    But integration isn’t just about hiding appliances. It’s also about creating custom cabinet solutions that work with your appliances. For example, a built-in coffee station with nearby storage for mugs and supplies can turn a corner of your kitchen into a cozy cafe. Or a baking station with a lowered countertop and storage for mixers and baking sheets can make whipping up a batch of cookies a breeze. These custom solutions are like creating little specialized zones in your kitchen – each with its own purpose and charm.

    Don’t forget about ventilation when planning your cabinet and appliance layout. A well-designed range hood can be both functional and a beautiful focal point in your kitchen. It’s like the crown jewel of your cooking area!

    Cost Considerations and Budgeting

    Let’s talk money. After all, budget often plays a big role in our cabinet choices. The average cost of kitchen cabinets can vary widely, depending on the materials, construction, and whether you’re going for stock, semi-custom, or fully custom cabinets.

    1. Stock cabinets are the most budget-friendly option, typically ranging from $100 to $300 per linear foot installed. These are pre-made cabinets that come in standard sizes. Think of them as the ready-to-wear clothing of the cabinet world – they might not be tailored to your exact measurements, but they can still look great and do the job well.
    2. Semi-custom cabinets offer more flexibility in sizes and styles, but at a higher price point, usually between $150 to $650 per linear foot installed. These are like the made-to-measure suits of cabinetry – not quite bespoke, but with room for personalization.
    3. Custom cabinets are the most expensive option, often starting at $500 per linear foot installed and going up from there. These are the haute couture of the cabinet world – made specifically for your space and to your exact specifications.

    But don’t worry if custom cabinets aren’t in your budget. There are plenty of ways to get a high-end look for less. Refacing existing cabinets or adding new hardware to stock cabinets can give your kitchen a fresh look without breaking the bank. It’s like giving your kitchen a makeover instead of a full renovation!

    Maintenance Tips for Longevity

    Once you’ve chosen and installed your perfect cabinets, you’ll want to keep them looking great for years to come. Proper maintenance is key to ensuring the longevity of your kitchen cabinets.

    For wood cabinets, regular dusting and cleaning with a soft, damp cloth is usually sufficient. Avoid using harsh chemicals or abrasive cleaners, as these can damage the finish. Think of it like caring for a fine piece of furniture – gentle treatment goes a long way.

    Laminate cabinets are generally easy to clean with just soap and water. For tougher stains, a mild all-purpose cleaner can do the trick. These cabinets are like the low-maintenance friend in your life – always looking good without much fuss.

    Metal cabinets might require special cleaners to maintain their shine and prevent rust. A mixture of warm water and mild dish soap usually works well for everyday cleaning. It’s like polishing your favorite piece of jewelry – a little effort keeps it sparkling.

    One common mistake to avoid is over-wetting your cabinets during cleaning. Excess moisture can seep into joints and cause swelling or warping. It’s like overwatering a plant – too much of a good thing can cause damage.

    Regular inspection of hinges and handles is also important. Tightening loose screws and adjusting hinges can prevent bigger problems down the line. Think of it as giving your cabinets a regular check-up – catching small issues before they become big ones.

    Conclusion

    Choosing the right kitchen cabinets for your space is a journey of balancing style, functionality, and budget. From shaker cabinets to smart storage solutions, from bold color trends to practical maintenance tips, we’ve covered a lot of ground. Remember, your kitchen is the heart of your home, and your cabinets play a starring role in that space. So take your time, consider your options, and choose cabinets that not only look great but also make your daily life easier and more enjoyable. After all, the best kitchen is one that reflects your style and meets your needs.

    Happy cabinet hunting!